The tutorial discuss the use of GNS3 software to run Cisco Virtual IOS (vIOS). Cisco vIOS is shipped and supported as a part of the Cisco's One Platform Kit (onePK) that is distributed in form of virtual machine. It might be downloaded with Cisco.com account. Currently, it is not required to have Cisco account associated with service contracts, Bill-to IDs, or product serial numbers in order to download onePK.
Software Prerequisites
- Host OS - any 64 bit Linux OS
- Qemu emulator and virtualizer compiled with x86_64 support
- KVM
- GNS3 0.8.7 - the last version that has Qemu support included
- Cisco all-in-one-VM-1.2.1-194.ova virtual machine
Minimum Hardware Requirements
- CPU with hardware virtualization support (AMD-V or VT-X virtualization extensions)
- Storage - 10 GB
- RAM - 2000 MB
- RAM vIOS - 384 MB
Script for Extracting vIOS from All-In-One VM
Here is a Linux bash script that helps you to extract vIOS vios-adventerprisek9-m.vmdk from all-in-one VM file. Download all-in-one.ova file from here and assign executable privileges to the script.
$ chmod +x extract_vios.txt
Then you can run the script as it is shown below. The only user input is selecting path to all-in-one VM file and entering a root password needed for temporary mount of raw image.
$ ./extract_vios
Script Requirements
- VirtualBox or Qemu installed
- +21GB free hard disk space to convert vmdk to raw format
- Root password to mount raw image
Configuration Steps for Extracting vIOS from All-In-One VM
1. Download the onePK All-In-One Virtual Machine
https://developer.cisco.com/site/networking/one/onepk/sdk-and-docs/all-in-one-vm/
Login with your Cisco account to download all-in-one virtual machine.
2. Extract Files from Virtual Machine
$ tar xvf all-in-one-VM-1.2.1-194.ova

Picture 1 - Content of OVA Tarball
The virtual disk all-in-one-VM-1.2.1-194-disk1.vmdk contains vIOS image that we are going to extract from the disk.
3. Extract vIOS from Virtual Disk
We can directly extract the vios image out of all-in-one-VM-1.2.1-194-disk1.img file.
a) Convert vmdk to raw disk
Use qemu-img utility to convert vmdk disk type to raw disk.
$ /usr/local/bin/qemu-img convert -O raw all-in-one-VM-1.2.1-194-disk1.vmdk all-in-one-VM-1.2.1-194-disk1.img
b) Check the available partitions inside the virtual disk
$ fdisk -l all-in-one-VM-1.2.1-194-disk1.img

Picture 2 - Available Partitions
c) Determine where the partition with vIOS image starts inside the virtual disk
The first partition flagged with boot option contains vIOS image. The partition starts at the sector 2048. The sector size is 512 bytes. When we multiple the starting sector number and the sector size we calculate the offset where the partition starts ( 512 x 2048 = 1048576 ).
$ echo '2048 * 512' | bc
1048576
d) Mount the partition and extract vIOS image from partition
Thanks the computed offset we can mount the partition and extract vIOS image from partition.
$ mkdir mount-point
$ sudo mount -o loop,ro,offset=1048576 all-in-one-VM-1.2.1-194-disk1.img mount-point/
$ tar xvf ./mount-point/usr/share/vmcloud/data/images/vios-adventerprisek9-m.ova -C /home/brezular/
The expected result is the file vios-adventerprisek9-m.vmdk located in a directory /home/brezular/.
4. Configure GNS3 to Run vIOS Disk
Start GNS3 and create a new project. Navigate to Edit -> Preferences -> Qemu -> General Settings. Configure Qemu general parameters and click test button.

Picture 3 - Qemu General Settings
Go ahead and configure GNS3 Guest settings. Navigate to Edit -> Preferences -> Qemu -> Qemu Guest. Configure vIOS parameters according to the picture below.
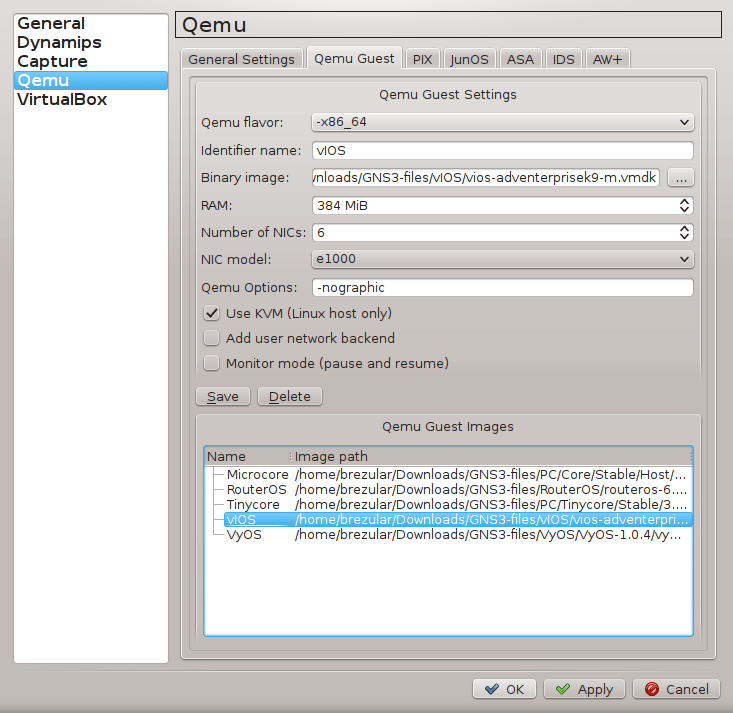
Picture 4 - Qemu vIOS Guest Settings
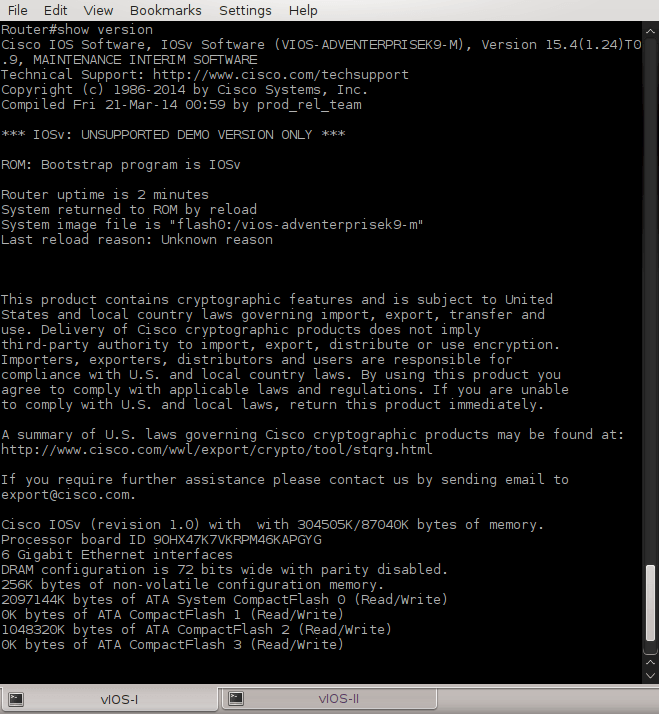
Picture 5 - Show Version Command
According to the show version command, vIOS distributed with onePK virtual machine is only demo version.
5. Testing Connectivity
The topology consists from the two routers running vIOS that are connected via GigabitEthernet0/0 interfaces.
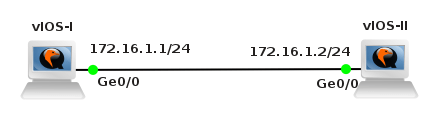
Picture 6 - Testing Topology
Configure vIOS routers as following.
Router>en
Router#conf t
Router(config)#hostname vOS-I
vIOS-I(config)#interface GigabitEthernet 0/0
vIOS-I(config-if)#ip address 172.16.1.1 255.255.255.0
vIOS-I(config-if)#no shutdown
vIOS-I(config-if)#do wr
Router>en
Router#conf t
Router(config)#hostname vIOS-II
vIOS-II(config)#interface GIgabitEthernet 0/0
vIOS-II(config-if)#ip address 172.16.1.2 255.255.255.0
vIOS-II(config-if)#no shutdown
vIOS-I(config-if)#do wr
Successful ping issued on the vIOS-I router proves that connectivity is established between virtual IOS instances.

Picture 7 - Ping Between vIOS Instances
End.