VyOS is a community fork of Vyatta, a Linux-based network operating system that provides software-based network routing, firewall, and VPN functionality. The VyOS project was started in late 2013 as a community fork of the GPL portions of Vyatta Core 6.6R1 with the goal of maintaining a free and open source network operating system in response to the decision to discontinue the community edition of Vyatta.
VyOS runs on both physical and virtual platforms. It supports paravirtual drivers and integration packages for virtual platforms. It is completely free and open source.
The aim of the tutorial is to show VyOS installation on Qemu virtual machine and get it working on GNS3.
VyOS Qemu and VirtualBox virtual disks can be downloaded here.
I created a Bash script deploy_vyos for automatic deployment of VyOS to Qemu image. The script downloads stable VyOS ISO image from the Internet, creates Qemu disk and starts Qemu virtual machine with attached ISO image. Then is starts Expect script install_vyos that automatically configure all required configuration options without user intervention.
Just copy both scripts to the same directory, assign run privileges to both scripts with the command below and run the deploy_vyos script.
$ chmod +x deploy_vyos
$ chmod +x install_vyos
Software and Hardware Prerequisites
- Host OS - any 64 bit Linux OS
- Hypervisor - Qemu emulator and virtualizer compiled with x86_64 support
- KVM
- GNS3 1.0 beta3 and later - the first new GNS3 version that has built-in support for Qemu hypervisor
- VyOS Installation ISO image
- CPU with hardware virtualization support (AMD-V or VT-X extensions)
- RAM minimum - 512 MB
- Storage - 2 GB
1. Download VyOS x64 Installation ISO
$ wget http://0.uk.mirrors.vyos.net/iso/release/1.1.0/vyos-1.1.0-amd64.iso
2. Create Qemu Virtual Disk
$ /usr/local/bin/qemu-img create -f qcow2 vyos-1.1.0-amd64.img 1G
3. Start Qemu Disk with Attached VyOS ISO
$ /usr/local/bin/qemu-system-x86_64 -boot d -cdrom ./vyos-1.1.0-amd64.iso -hda vyos-1.1.0-amd64.img -enable-kvm -m 1G -serial telnet:localhost:3355,server,nowait
Connect to VyOS console with the telnet command:
$ telnet localhost 3355
4. VyOS Installation
Login as user vyos with the password vyos. Issue the command install system to install a new system to hard drive and follow installation instructions. When installation is finished, do not reboot the system as we are going to adapt VyOS to support GNS3. To make changes in VyOS that is installed on the /dev/sda1 disk we first have to mount it the disk.
vyos@vyos:~$sudo su
root@vyos:/home/vyos#mount -t ext4 /dev/sda1 /tmp
Now our VyOS installation is mounted to the /tmp directory.
5. Stop Generating New Name for Ethernet Interfaces with Changed MAC Address
Qemuwrapper, the script that controls Qemu inside GNS3 always starts Qemu virtual machines with randomly generated MAC addresses for Ethernet interfaces. VyOS with underlying Debian Linux is programmed to remember MAC address of existing Ethernet interfaces. During the boot when VyOS detects that a particular interface has a new MAC address assigned (generated by qemuwrapper), VyOS assigns a new name to this interface. Thanks to this, name of Ethernet interfaces are changed everytime is VyOS rebooted.
This is not a desirable behavior so we are going to configure VyOS to keep an original name of interface even if the interface MAC address had been changed.
First, rename the file vyatta_net_name to vyatta_net_name_backup.
vyos@vyos:~$ sudo su
root@vyatta:/home/vyatta#mv /tmp/lib/udev/vyatta_net_name /tmp/lib/udev/vyatta_net_name.bak
root@vyatta:/home/vyatta#mv /tmp/lib64/udev/vyatta_net_name /tmp/lib64/udev/vyatta_net_name.bak
Then, issue the following commands to add MAC addresses starting with the hex numbers 00 to the list of Ethernet interfaces with the names that will never be changed.
root@vyatta:/home/vyatta#sed -i 's/2367abef/00/g' /tmp/lib/udev/rules.d/75-persistent-net-generator.rules
root@vyatta:/home/vyatta#sed -i 's/2367abef/00/g' /tmp/lib64/udev/rules.d/75-persistent-net-generator.rules
The commands change the line ENV{MATCHADDR}=="?[2367abef]:*", ENV{MATCHADDR}="" to ENV{MATCHADDR}=="?[00]:*", ENV{MATCHADDR}="" for both files:
/lib/udev/rules.d/75-persistent-net-generator.rules
/lib64/udev/rules.d/75-persistent-net-generator.rules
6. Change Boot Order
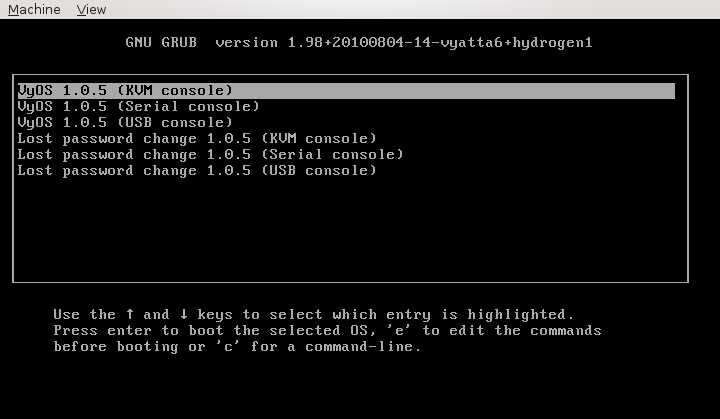
They are several boot options available in Grub menu window when VyOS is booted after its installation. Depending how VyOS was installed, the default option is configured by VyOS itself. For instance if we issued a command install system from a Qemu window, an option KVM console would be chosen as the default option. In our case, installation was done from the telnet window (serial console) so the option Serial console is chosen as the default boot option.
Picture 1 - VyOS Grub Menu Window
As we want to integrate VyOS Qemu virtual machine with GNS3 and use a serial console to connect VyOS instances running inside GNS3, we will do such as configuration which ensures that an option Serial console is always selected regardless of the type of installation.
root@vyatta:/home/vyatta#sed -i 's/set default=0/set default=1/g' /tmp/boot/grub/grub.cfg
The command replaces the default option 0 (KVM console) with the default option 1 (Serial console).
VyOS Integration to GNS3 Project
7. Configure GNS3 to Run VyOS Virtual Machine
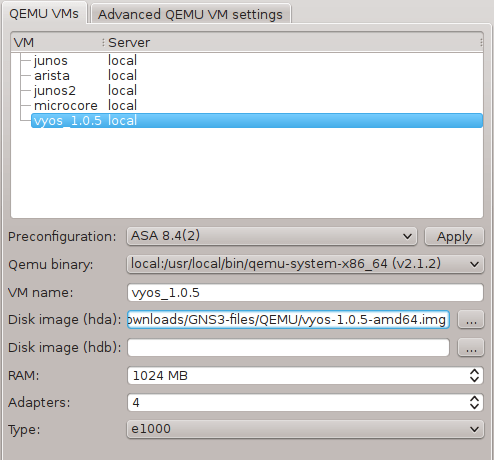
Start GNS3 and create a new project. Navigate to Edit -> Preferences -> Qemu VMs. Configure VyOS Qemu settings as following.
Picture 2 - Qemu VyOS Settings
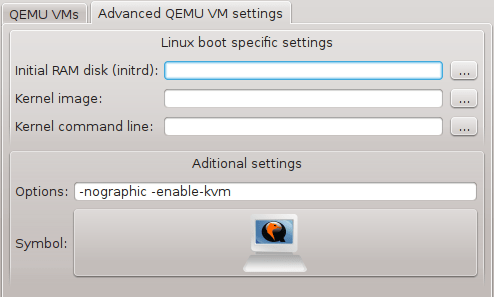
Click Advanced Qemu VM Settings tab and configure following parameters.
Picture 3 - Advanced Qemu VyOS Settings
VyOS User Guide:
http://vyos.net/wiki/User_Guide
End.


