MikroTik RouterOS is the stand-alone operating system of MikroTik RouterBOARD hardware. It can also be installed on a PC and will turn it into a router with all the necessary features - routing, firewall, bandwidth, management, wireless access point, backhaul link, hotspot, gateway, VPN server and more.
The tutorial explains how to install RouterOS on Qemu virtual disk and configure GNS3 software to run such a router. Later, We will use GNS3 to a create simple testing topology with one RoutersOS router connected to emulated Cisco 3725 router.
You can download Mikrotik RouterOS x86 installed on Qemu and VirtualBox images in the Download section here.
Software Prerequisites
- GNS3 with Qemu or VirtualBox support (the last GNS3 version with Qemu/VirtualBox support is 0.8.7, the current GNS3 version 1.0.7 Alpha has not implemented support for Qemu and VirtualBox hypervisor yet
- Qemu or VirtualBox
- RouterOS ISO image - mikrotik-6.15.iso
Virtual Machine Prerequisites
- i386 compatible architecture
- minimum 32MB of RAM (maximum supported 2GB)
- minimum Hard Disk space 64MB
- Network cards supported by linux v3.3.5 kernel (PCI, PCI-X)
RouterOS x86 Installation
1. Download RouterOS for x86 Architecture
$ wget http://download2.mikrotik.com/routeros/6.15/mikrotik-6.15.iso
2. Create Qemu Virtual Disk and Start Virtual Machine
$ /usr/local/bin/qemu-img create -f qcow2 routeros-6.15.img 200M
$ /usr/local/bin/qemu-system-i386 -m 512 -enable-kvm -boot d -cdrom mikrotik-6.15.iso routeros-6.15.img
3. Install RouterOS
Use spacebar to select packages that are needed. Then press I to install RouterOS.
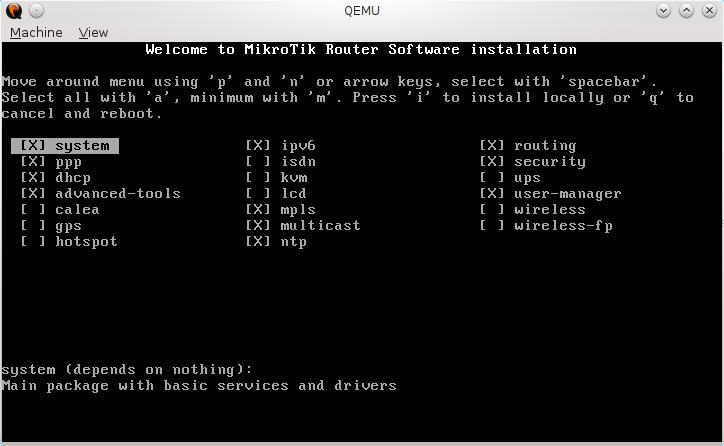
Picture 1 - RouterOS Installation
Once RouterOS is installed, you have 24 hours to enter a license key to activate RouterOS Qemu image. The timer stops if router is shutdowned. For this reason, we let GNS3 automatically create the copy of base Qemu image everytime is a new RouterOS instance placed on the GNS3 desktop. These independent copy of the base image can be run for total 24 hours time period.
4. Start RouterOS Qemu Disk
After the disk is formatted and packages copied, start RouterOS instance with the command:
$ /usr/local/bin/qemu-system-i386 -m 512 -enable-kvm -boot c routeros-6.15.img -nographic -serial telnet::4444,server,nowait
You should be able to login to RouterOS with the telnet command:
$ telnet 127.0.0.1 4444
Username is admin without password set.
5. Connect Qemu image to GNS3
I assume that GNS3 is correctly installed and configured.
a) Start GNS3 and create a new GNS3 project
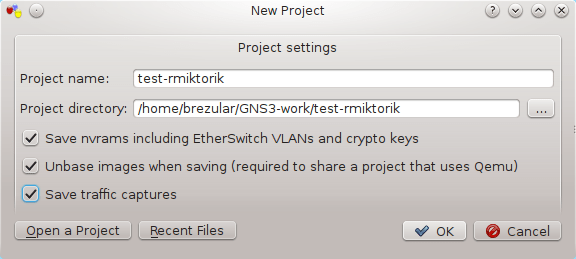
Picture 2 - Creating GNS3 New Project
b) Configure Qemu guest settings
Navigate to Edit -> Preferences -> Qemu -> Qemu Guest and configure parameters as it is shown on the picture below.

Picture 3 - Qemu Guest Settings
RouterOS Configuration
1. Testing Topology
The topology consists of one RouterOS that connects two Microcore Qemu instances. As we want to test switching and VLANs, both Microcore instances are connected to RouterOS switvchport that are separated by VLANs - VLAN10 and VLAN20.
RouterOS's interface Ethernet1 si connected to Cisco 3725 router emulated by Dynamips. The port will be configured as a trunk port on RouterOS side and as a routed port with two sub-interfaces on Cisco's side.
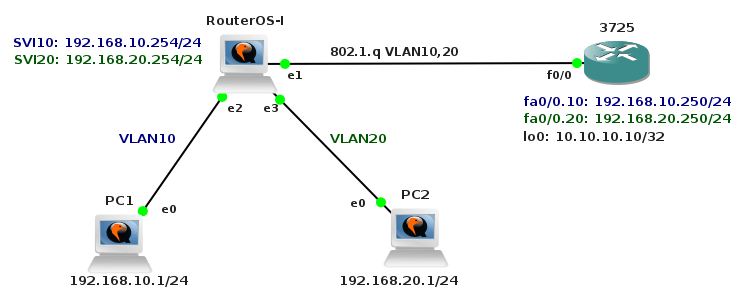
Picture 4 - Testing Topology
2. Create Bridges for VLAN10 and VLAN20 and Assign Access Ports to Bridges
First, check available Ethernet interfaces.They are six Ethernet interfaces presented in RouterOS console in total.
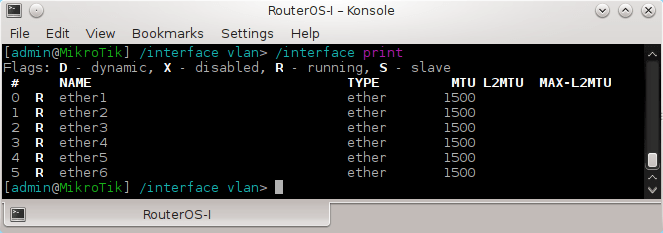
Picture 5 - Router Ethernet Interfaces
We are going to create bridges br10 and br20 and assign interface Ethernet2 to the bridge br10 and Ethernet3 to br20.
[admin@MikroTik] > /interface bridge add name=br10
[admin@MikroTik] > /interface bridge add name=br20
[admin@MikroTik] > /interface bridge port add interface=ether2 bridge=br10
[admin@MikroTik] > /interface bridge port add interface=ether3 bridge=br20
3. Configure Trunk Port to allow VLAN 10 and VLAN 20 and create Switched Virtual Interfaces - SVI10 and SVI20
[admin@MikroTik] > /interface vlan add vlan-id=10 name=SVI10 interface=ether1 disabled=no
[admin@MikroTik] > /interface vlan add vlan-id=20 name=SVI20 interface=ether1 disabled=no
Note: the term SVI is used in a Cisco world, feel free to change it if you want.
4. Add SVI Ports to Bridges
[admin@MikroTik] > /interface bridge port add interface=SVI10 bridge=br10 disabled=no
[admin@MikroTik] > /interface bridge port add interface=SVI20 bridge=br20 disabled=no

Picture 6 - Bridge Ports Configuration
5. Assign IP address to SVI Ports
This configuration ensures that intervlan routing betwwen VLAN 10 and VLAN20 can be done by RouterOS.
[admin@MikroTik] > /ip address add interface=SVI10 address=192.168.10.254/24 disabled=no
[admin@MikroTik] > /ip address add interface=SVI20 address=192.168.20.254/24 disabled=no
At this point you should be able to make successful ping between PC1 and PC2.
6. Set password and hostname
[admin@MikroTik] > /password new-password=admin
[admin@MikroTik] > /system identity set name=RouterOS-I
7. Static routing configuration
[admin@RouterOS-I] > /ip route add dst-address=10.10.10.10/32 gateway=192.168.10.253
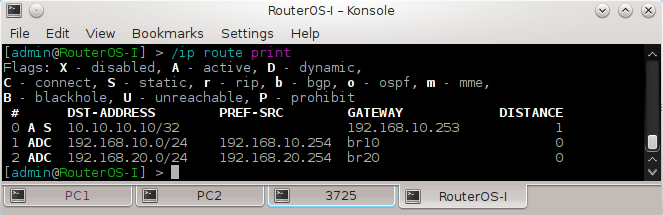
Picture 7 - Routing Table
End hosts PC1 and PC2 Configuration
End hosts are represent by Microcore Linux 3.8.2 installed on Qemu virtual disks. Ethernet interfaces configuration is stored in the file /opt/bootlocal.sh that is started during the boot of Microcore. To save configuration changes, the script /usr/bin/filetool.sh must be called with parameter -b.
PC1
tc@box:~$ sudo su
root@tc:# echo "ifconfig eth0 192.168.10.1 netmask 255.255.255.0 up" >> /opt/bootlocal.sh
root@tc:# echo "hostname PC2" >> /opt/bootlocal.sh
root@tc:# echo "route add default gw 192.168.10.254" >> /opt/bootlocal.sh
root@tc:~# /opt/bootlocal.sh
root@PC1:~# /usr/bin/filetool.sh -b
PC2
tc@box:~$ sudo su
root@tc:# echo "ifconfig eth0 192.168.20.1 netmask 255.255.255.0 up" >> /opt/bootlocal.sh
root@tc:# echo "hostname PC2" >> /opt/bootlocal.sh
root@tc:# echo "route add default gw 192.168.20.254" >> /opt/bootlocal.sh
root@tc:~# /opt/bootlocal.sh
root@PC2:~# /usr/bin/filetool.sh -b
Cisco 3725 Configuration
1. Router-on-the-stick Configuration
3725#conf t
3725(config)#interface fastEthernet 0/0
3725(config-if)#no shut
3725(config-if)#exit
3725(config)#interface FastEthernet 0/0.10
3725(config-subif)#encapsulation dot1Q 10
3725(config-subif)#ip address 192.168.10.253 255.255.255.0
3725(config-subif)#no shutdown
3725(config-subif)#int fa0/0.20
3725(config-subif)#encapsulation dot1Q 20
3725(config-subif)#ip address 192.168.20.253 255.255.255.0
3725(config-subif)#no shutdown
2. Loopback configuration
725(config)#interface loopback 0
3725(config-if)#ip address 10.10.10.10 255.255.255.255
3725(config-if)#no shutdown
Testing Connectivity
1. Check if RouterOS does Packet Switching Between VLAN10 and VLAN20 Subnets
Issue the command ping on PC1 to test connectivity between PC1 and PC2.
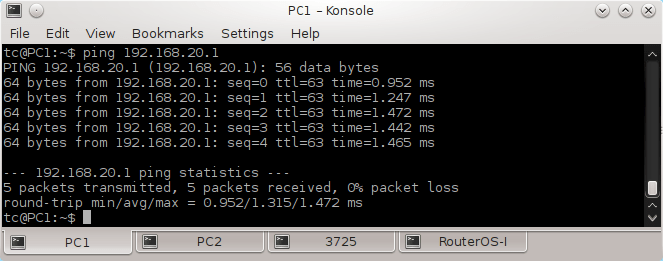
Picture 8 - RouterOS InterVlan Routing
2. Check if VLAN Tagged Traffic is Transferred via Trunk Port
Ping from PC1 to Cisco 3725 router's IP address 192.168.10.253
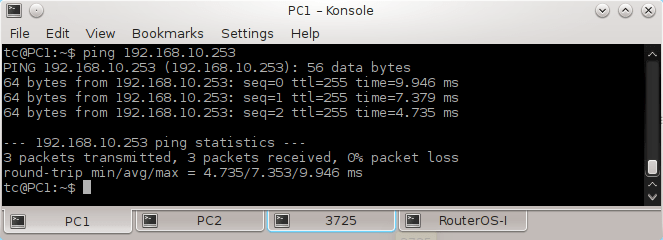
Picture 9 - Ping from PC1 to Cisco 3725
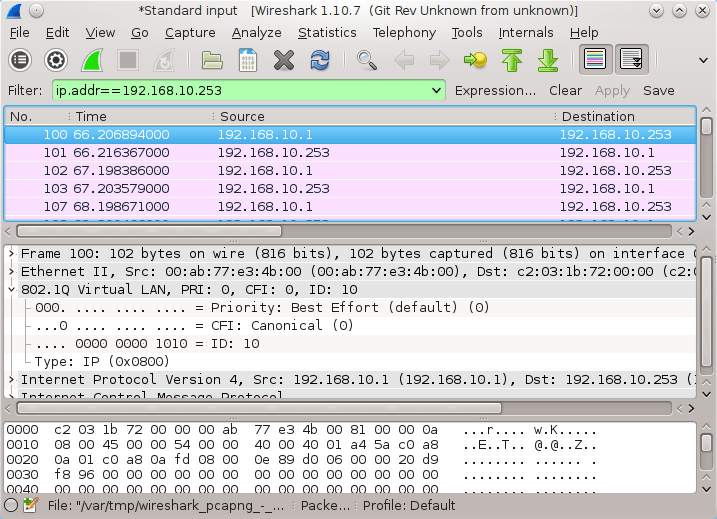
Picture 10 - Captured Traffic on Cisco 3725 Interface FastEthernet0/0
End.
RouterOS Basic Commands
http://rbmikrotik.blogspot.sk/2011/07/mikrotik-router-os-basic-commands.html
RouterOS x86 Features
http://wiki.mikrotik.com/wiki/Manual:RouterOS_features
http://download2.mikrotik.com/what_is_routeros.pdf
RouterOs Switching
http://wiki.mikrotik.com/wiki/Manual:Switch_Chip_Features
http://wiki.mikrotik.com/wiki/Manual:Interface/Bridge#Bridge_Interface_Setup
RouterOS VLANs
http://wiki.mikrotik.com/wiki/Vlans_on_Mikrotik_environment