EOS (Extensible Operating System) is Linux-based network operating system developed by Arista Networks that runs on all Arista switches. Virtual EOS (vEOS) is single image and can be run in a virtual machine. The article describes how to set up vEOS virtual machine and connects it to GNS3 in order to test EOS functionality.
Host Requirements
Linux x86-64
Qemu or VirtualBox installed
Virtual Machine Requirements
1024 MB RAM
IDE CD-ROM drive with mounted Aboot-veos-serial-2.0.8.iso
2GB flash IDE disk - vEOS-4.14.2F.vmdk
NICs e1000 type
1. Download Bootloader and Virtual EOS
Clik the link to create a new account. The guest account (when no corporate email is used for registration e.g. gmail.com) is sufficient to download vEOS software. Click the link and login with the credentials you entered during the registration. You have to accept License Agreement in order to download vEOS software.
Download the bootloader and a virtual disk:
Aboot-veos-serial-2.0.8.iso
vEOS-4.14.2F.vmdk
2. Arista Switch First Boot on Qemu
Use Qemu to boot Arista switch virtual machine for the first time.
$ /usr/local/bin/qemu-system-x86_64 -m 1024 -enable-kvm -cdrom ./Aboot-veos-serial-2.0.8.iso -boot d vEOS-4.14.2F.vmdk -serial telnet::3355,server,nowait
Connect to the serial port of the image with the command below and check the boot proccess:
$ telnet localhost 3355
During the first boot, the file vEOS.swi (about 209MB) is being copied as .boot-image.swi to flash. The process may take several minutes to complete. When the switch boots up, login with the username admin with no password set. Switch to the enable mode and shutdown the switch with the command:
localhost>enable
localhost#sudo bash shutdown -h now
3. GNS3 Qemu Settings Configuration
Navigate to Edit-> Preferences-> Qemu VMs. Configure VMs settings according the picture below.
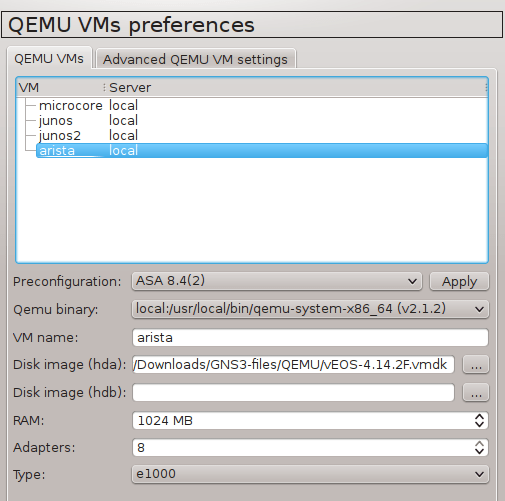
Picture 1 - GNS3 Qemu vEOS Settings
Switch to Advanced Qemu VMs Settings tab and configure following settings.
-boot d -cdrom Aboot-veos-serial-2.0.8.iso -enable-kvm -nographic
Replace the path to ISO with your own path.
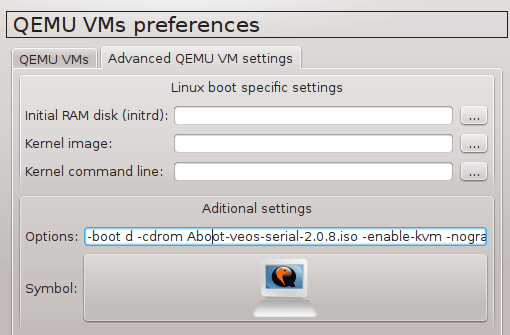
Picture 2 - GNS3 Qemu vEOS Advanced Settings
4. Creating VirtualBox vEOS Virtual Machine
To run Arista switch on VirtualBox, you must create VirtualBox virtual machine. Start VirtualBox with the command:
$ sudo virtualbox
Create a new machine with Ctrl-n. Choose Linux Fedora (64 bit) and assign 1024 MB to a virtual machine. Select an option Do not add a virtual hard drive. Edit settings of the virtual machine with Ctrl-s and navigate to Storage menu. Remove SATA controler and click cdrom symbol. Select path to the file Aboot-veos-serial-2.0.8.iso. Click on Controller IDE and add hard disk. Select and option Choose existing disk and select path to the file vEOS-4.14.2F.vmdk.
Comapring to Arista first boot on Qemu, the first boot on VirtualBox takes only few seconds.
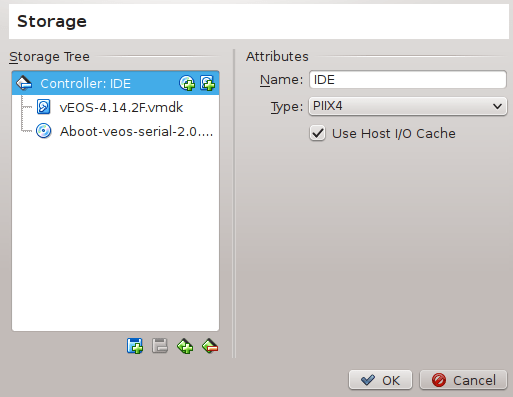
Picture 3 - Arista Vbox VM Storage Configuration
Start GNS3 and press Ctrl-Shift-P. Navigate to VirtualBox VMs and click refresh button. Configure settings according to the picture below.
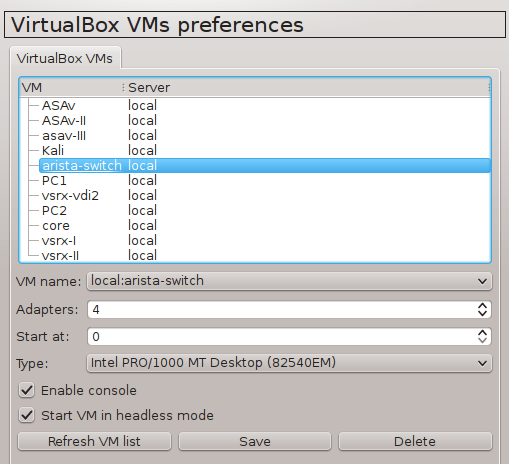
Picture 4 - GNS3 VirtualBox VMs Preferences Configuration
5. Arista Switches Configuration
We are going to build a network topology that helps us to test configuration of VLANs, trunks and inter VLAN routing on Arista switches.The topology consists of two Arista switches and four computers, all these are emulated by Qemu. Switches are connected via 802.1q trunk with only traffic from VLAN20 allowed on trunk port. Computers are running Linux Core and they are connected to Arista switchports with configured either VLAN10 or VLAN30 on switchports. IP routing must be enabled on both switches in order to forward traffic between VLANs. Thanks to enabled OSPF routing protocol, the switch Arista1 receives info about the network 192.168.30.0/24 connected to the switch Arista2 and the switch Arista2 receives info about the network 192.168.10.0/24 that is connected to the switch Arista1.
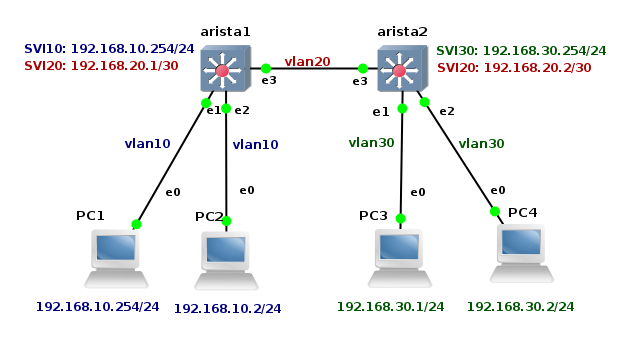
Picture 5 - Network Topology
Arista1
localhost>enable
localhost#conf t
localhost(config)#hostname Arista1
Arista1(config)#enable secret arista
Arista1(config)#username admin secret arista
Arista1(config)#vlan 10
Arista1(config-vlan-10)#vlan 20
Arista1(config-vlan-10)#exit
Arista1(config)#interface ethernet 1
Arista1(config-if-Et1)#switchport mode access
Arista1(config-if-Et1)#switchport access vlan 10
Arista1(config-if-Et1)#no shutdown
Arista1(config-if-Et1)#interface ethernet 2
Arista1(config-if-Et2)#switchport mode access
Arista1(config-if-Et2)#switchport access vlan 10
Arista1(config-if-Et2)#no shutdown
Arista1(config-if-Et2)#interface ethernet 3
Arista1(config-if-Et3)#switchport mode trunk
Arista1(config-if-Et3)#switchport trunk allowed vlan 20
Arista1(config-if-Et3)#no shutdown
Arista1(config)#interface vlan 10
Arista1(config-if-Vl10)#ip address 192.168.1.254 255.255.255.0
Arista1(config-if-Vl10)#no shutdown
Arista1(config)#interface vlan 20
Arista1(config-if-Vl20)#ip address 192.168.20.1 255.255.255.252
Arista1(config-if-Vl20)#no shutdown
Arista1(config-if-Vl20)#ip routing
Arista1(config-if-Vl20)#router ospf 10
Arista1(config-router-ospf)#network 192.168.10.0/24 area 0
Arista1(config-router-ospf)#network 192.168.20.0/30 area 0
Arista1(config-router-ospf)#write mem
PC1
tc@box:~$ sudo su
root@box:~# ifconfig eth0 192.168.10.1 netmask 255.255.255.0 up
root@box:~# route add default gw 192.168.10.254
root@box:# hostname PC1
root@PC1:~# echo "ifconfig eth0 192.168.10.1 netmask 255.255.255.0 up" >> /opt/bootlocal.sh
root@PC1:~# echo "route add default gw 192.168.10.254" >> /opt/bootlocal.sh
root@PC1:~# echo "hostname PC1" >> /opt/bootlocal.sh
root@PC1:~# /usr/bin/filetool.sh -b
PC2
tc@box:~$ sudo su
root@box:~# ifconfig eth0 192.168.10.2 netmask 255.255.255.0 up
root@box:~# route add default gw 192.168.10.254
root@box:~# hostname PC2
root@PC2:~# echo "ifconfig eth0 192.168.10.2 netmask 255.255.255.0 up" >> /opt/bootlocal.sh
root@PC2:~# echo "route add default gw 192.168.10.254" >> /opt/bootlocal.sh
root@PC2:~# echo "hostname PC2" >> /opt/bootlocal.sh
root@PC2:~# /usr/bin/filetool.sh -b
Arista2
localhost>enable
localhost#conf t
localhost(config)#hostname Arista2
Arista2(config)#enable secret arista
Arista2(config)#username admin secret arista
Arista2(config)#vlan 20
Arista2(config-vlan-20)#vlan 30
Arista2(config-vlan-30)#interface ethernet 1
Arista2(config-if-Et1)#switchport mode access
Arista2(config-if-Et1)#switchport access vlan 30
Arista2(config-if-Et1)#no shutdown
Arista2(config-if-Et1)#interface ethernet 2
Arista2(config-if-Et2)#switchport mode access
Arista2(config-if-Et2)#switchport access vlan 30
Arista2(config-if-Et2)#no shutdown
Arista1(config)#interface vlan 30
Arista1(config-if-Vl30)#ip address 192.168.30.254 255.255.255.0
Arista1(config-if-Vl30)#no shutdown
Arista1(config-if-Vl30)#interface vlan 20
Arista1(config-if-Vl20)#ip address 192.168.20.2 255.255.255.252
Arista1(config-if-Vl20)#no shutdown
Arista1(config-if-Vl20)#ip routing
Arista2(config)#router ospf 10
Arista2(config-router-ospf)#network 192.168.20.0/30 area 0
Arista2(config-router-ospf)#network 192.168.30.0/24 area 0
Arista1(config-router-ospf)#write mem
PC3
tc@box:~$ sudo su
root@box:~# ifconfig eth0 192.168.30.1 netmask 255.255.255.0 up
root@box:~# route add default gw 192.168.30.254
root@box:~# hostname PC3
root@PC3:~# echo "ifconfig eth0 192.168.30.1 netmask 255.255.255.0 up" >> /opt/bootlocal.sh
root@PC3:~# echo "route add default gw 192.168.30.254" >> /opt/bootlocal.sh
root@PC3:~# echo "hostname PC3" >> /opt/bootlocal.sh
root@PC3:~# /usr/bin/filetool.sh -b
PC4
tc@box:~$ sudo su
root@box:~# ifconfig eth0 192.168.30.2 netmask 255.255.255.0 up
root@box:~# route add default gw 192.168.30.254
root@box:~# hostname PC4
root@PC4:~# echo "ifconfig eth0 192.168.30.2 netmask 255.255.255.0 up" >> /opt/bootlocal.sh
root@PC4:~# echo "route add default gw 192.168.30.254" >> /opt/bootlocal.sh
root@PC4:~# echo "hostname PC4" >> /opt/bootlocal.sh
root@PC4:~# /usr/bin/filetool.sh -b
6. Testing Arista Switches
Issue the command show ip route on the switch Arista1 to check if the OSPF routes are presented in its routing table.
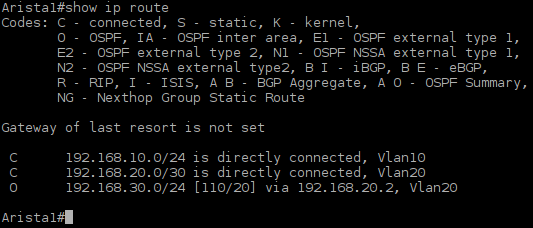
Picture 6 - Available Routes in Routing Table of Arista1 Switch
If the switch Arista 1 learned path to the network 192.168.30.0/24, you can test the connectivity between PC1 and PC3 with traceroute command.
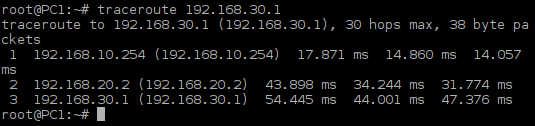
Picture 7 - Testing Connectivity Between PC1 and PC3
Reference:
http://blog.scottlowe.org/2014/08/11/running-arista-veos-on-kvm/
End.